JustaDome
Introduction
Domes are very interesting and fun structures to work with and look at. They are unexpectedly strong and versatile. There is a lot of info about constructing domes from all manners of material, mostly concerning wood or metal pipes; and a lot of them require special or hard-to-get connection systems that make construction easy or just simply 'strong' for permanent use.
However, sometimes, you just want to own a dome that you can store in a sports-bag and put up and/or take apart in less than an hour and costs around 40 euro of parts. If you are this kind of person: this project is for you.
Basics

The idea behind this project is to use easily acquired trash-material as a basis for a dome.
It turns out that finding thrown-away wooden 'slatted bed bases' is quite easy. A lot of people throw them out into the trash the moment one of the slats break. A nice aspect about this base-material is that is often comes in semi-standard sizes. Finding enough material of 80CM slats turns out to be quite do-able.
Looking at dome construction techniques, it turns out that there is a fairly common and easily constructed arrangement available that will produce a dome with the specifications below:
3m60 diameter
2.2M height
Made out of 165 pieces of wood, joined at 61 places by steel bolts + wingnuts. The dome does not need to come apart entirely into seperate pieces of wood. Instead you can have it be kept and transported in around 30 bundles of wood that make assembly an easy thing to do.
Specifics
The dome design I based the JustaDome on is summarized as follows:
([The dome's parameters in the Acid Dome Calculator])
- A 7/12th spherical dome
- Equal Chords arrangement
- Pentad symmetry
- Level 3 detail, subdivision class I
- Approx 1.84m radius
This involves making
80 x 80cm lengths 55 x 78.5cm lengths 30 x 68.3cm lengths
A lot of bed bases are around 80 CM wide; this means that it is smart to standardize on this size as the largest length we use.
To drill the holes, mark a hole 2cm from from the end, on each end. It makes sense to use a marking jig to make this easy instead of having to use a ruler to do so each time. Use a block of wood, underneath your slat, to drill into so that you get nice clean holes. Most of the work is in cleaning up the drilled holes, preferably with a reaming bit from both sides. This means 4 operations per slat (you can see that this takes the most work).
Lockbolts , rings and wingnuts

You will have 60 joints to make. You will need 60 bolts, 60 rings and 60 wingnuts.
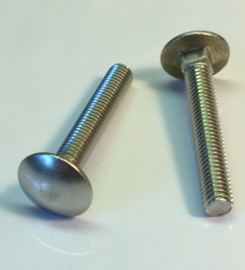
The holes should be a useful diameter; I used 6mm 'lockbolts' which have a lovely semi-spherical topside and a square profile just underneath which 'digs' into the wood and makes sure it stays nicely in place. The length of the bolt should be enough to connect 6 layers of wood together + a little more for the wing-nut to fasten onto. If you use 1CM thick wooden slats, you will require a 7CM lockbolt to connect it.
The wingnuts should fit your lockbolts. The rings should be nice and large to spread the force of the bolt and wingnut across the wood. 35mm rings seem to work well for this.
It never hurts to have some spare as you might lose them in buildup or takedown somewhere in high grass.