Difference between revisions of "X201/Coreboot"
(→Raspberry PI) |
|||
| Line 1: | Line 1: | ||
Page on getting coreboot installed on the X201 | Page on getting coreboot installed on the X201 | ||
| + | |||
| + | == Opening up the x201 == | ||
| + | <gallery widths=350px heights=150px> | ||
| + | File:x201-flash_0000.JPG|Flashchip is placed under the keyboard | ||
| + | File:x201-flash_0001.JPG|Remove battery first, it hides one screw | ||
| + | File:x201-flash_0002.JPG|4 screws keep the keyboard in placed | ||
| + | File:x201-flash_0003.JPG|Remove keyboard by pushing it screenwards with flat-tip screwdriver | ||
| + | File:x201-flash_0004.JPG|Keep in mind that the keyboard is still connected. You might want to disconnect it. | ||
| + | File:x201-flash_0005.JPG|Flashchip is located just above the yellow battery | ||
| + | File:x201-flash_0008.JPG|You can cut the plastic a bit open or remove it entirely | ||
| + | File:x201-flash_0009.JPG|Here we see our 8-pin flashchip. | ||
| + | File:x201-flash_0013.JPG|And add a SOIC-8 clamp to connect your flasher. | ||
| + | </gallery> | ||
== Flashrom == | == Flashrom == | ||
| Line 8: | Line 21: | ||
=== Raspberry PI === | === Raspberry PI === | ||
| + | |||
* https://www.flashrom.org/RaspberryPi ([https://web.archive.org/web/*/https://www.flashrom.org/RaspberryPi archive]) | * https://www.flashrom.org/RaspberryPi ([https://web.archive.org/web/*/https://www.flashrom.org/RaspberryPi archive]) | ||
Revision as of 19:09, 26 March 2016
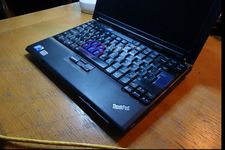
Page on getting coreboot installed on the X201
Opening up the x201
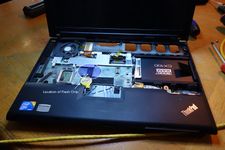
Flashchip is placed under the keyboard
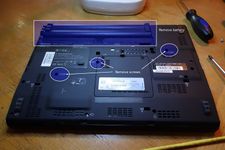
Remove battery first, it hides one screw
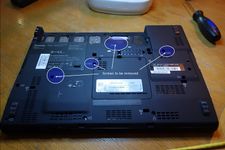
4 screws keep the keyboard in placed
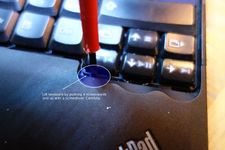
Remove keyboard by pushing it screenwards with flat-tip screwdriver
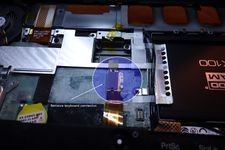
Keep in mind that the keyboard is still connected. You might want to disconnect it.
Flashchip is located just above the yellow battery
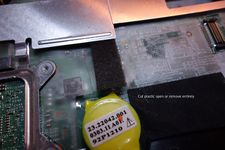
You can cut the plastic a bit open or remove it entirely

Here we see our 8-pin flashchip.
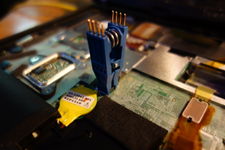
And add a SOIC-8 clamp to connect your flasher.


Flashrom
U can use flashrom to backup and write your flash.
flashrom download: https://www.flashrom.org/Downloads
Raspberry PI
- https://www.flashrom.org/RaspberryPi (archive)
- https://www.raspberrypi.org/documentation/usage/gpio/ (archive)
Here's how to connect the Raspberry pi GPIO to the chip.
 ===  front (display) ====
 3.3V (pin 17)   N/C          (S)CLK/SCK (pin 23)  MOSI (pin 19)
      |        |             |              |
 dot  |        |             |              |
 CS (pin 24)   MISO (pin 21) N/C           ground (pin 25)
 ===  back (touchpad) ===
The Raspberry PI might not be able to provide enough power for the chip. Find a different 3.3v source, provide PSU-power to the laptop, desolder the chip or improvise.
You can read the flash via (asuming you have the MX25L6445):
./flashrom -p linux_spi:dev=/dev/spidev0.0 -c "MX25L6436E/MX25L6445E/MX25L6465E/MX25L6473E" -r x201-flash.bin
Do this twice and compare files to check for read errors.
Issues
- as per 2016-03-15 the last working coreboot version was: a3e41c089602c58409e8dfd4aceecbdd7d4f4a5b
Files
- Datasheet of flashchip: 25L6445E