Justa mini fpv
Contents
General
Over the past year or so, the 250-class 'mini racer' formfactor has become the de-facto standard for fun-oriented FPV (First Person View) flying. There are many frame-designs out there in this class. The ZMR250 is one of them and, likely, one of the cheapest.
ZMR-250
This frame is a clone/ripoff/whatever of some of the other designs that were already out there. The design-plans seem to be in the hands of quite a few chinese carbon-cutting shops. There are models available that are not even carbon, too. Glass-fiber and glass-fiber/carbon laminate versions are also available.
The full carbon-frame version can be found for around €30,- online. BangGood.com is a good place to go looking for it.
The design does have some issues, however; mainly in the area of the motor-arms. People have observed that while they may not actually be too thin, they do seem to have too little material reserved around the holes to resist some of the forces that come onto the aircraft in a crash.
Furthermore; unlike some other designs, the ZMR250 comes with 100% metal screws. It is advisable to replace those involved in the top/bottom-plate assembly with Nylon bolts, instead. These should shear off cleanly in the case of a crash, leaving your carbon plates intact for as much as possible.
The design
The design is a run-of-the-mill quadcopter setup with no special gimmicks except that it has an FPV set strapped to it, of course. Next to that, telemetry is a 'big thing' in the sense that it allows careful monitoring of battery-performance over a large distance (which makes an audio-alarm with a beeper rather less useful).
Given the small size of the frame, the rotors are based on the 5030 (5 Inch diameter, 3 inch pitch) propellor size. The finished frame ends up being around 400-500 grams with battery; requiring a thrust of 500g to lift off. A good 1000g of thrust is desirable to have proper headroom for maneuvers. This results in a per-motor lift of at least 250g. Given the small prop-size, the motors need to spin relatively fast. 2400kV rating seems normal.
The ESC's add weight and should be chosen to be as light as possible for their power-rating. Normally around 10-12A esc's are more than sufficient.
The flight-controller does not have to be very fancy; though one often ends up finding the cheaper models do not report telemetry and such. An STM32-based board doesnt cost much anymore and fits the bill nicely. CleanFlight firmware has become a popular choice.
The FPV setup (largely) operates seperately from the rest of the aircraft. The only interconnections are with the battery/power-system and , if available, the OnScreenDisplay module (OSD) that mixes the telemetry data into the video-stream. A light-weight camera with wide-angle lens is desired. The Sony TVL700 is a popular choice. It also has good contrast and light-response characteristics. A 200mWatt+ transmitter is required to be of any use. Normally the 5.8Ghz frequency is chosen for the FPV setup, allowing for small/light antennas. The clover-leaf antenna-configuration is very popular.
The receiver is nothing special though something that can do 5+ channels and use PPM-sum is advisable. The D4R-II seems to fit the bill perfectly, also allowing for signal-strength reporting to the OSD. It also has a telemetry-input that allows reporting of telemetry also to the transmitter and/or associated devices.
The power-distribution can be anything as simple as a wire-harness or something as elaborate as a custom-made PCB with extra features available for providing filtered power for the FPV setup and/or LEDs, etc.
The battery should be able to provide at least around 35C of discharge; 1800mAH-or-more. The 2200mAh size seems to be the limit of what's useful, nowever.
The build
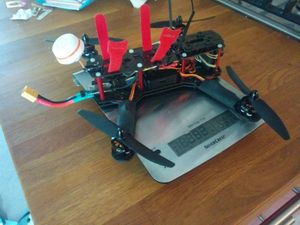
My build is a pretty standard setup:
- ZMR-250 full carbon frame
- 4 x ZMR 1804, 2400kV motors . Clockwise/Anti-clockwise. Not very efficient, but provide 275g of thrust at 8A with 5030 prop.
- 4 x 10A 'SimonK'-firmware ESC's
- 1 x Naze32 'Flip' flight-controller (with baro and compass)
- 1 x D4R-II receiver, configured with PPM-sum and RSSI available
- 1 x Eachine FPV set: Sony camera + 200mWatt 5.8Ghz transmitter; 32-channels.
- 2 x Cloverleaf antenna (one for FPV set, one for FPV receiver)
- 1 x Bluetooth module (HC-06) for remote/easy configuration of flight controller
I replaced all screws with nylon screws (except those that connect the motor arms); this should protect the carbon from breaking too much when involved in a heavy crash.
The motors have all been soldered directly to the ESC's with the wire-lengths reduced so as to lay the ESC perfectly across a free spot on the arm. The ESC was then first wrapped in shrink-tubing before another (larger) tubing is used to fasten the ESC on the arm itself. The extra layer of tubing is required since carbon-fiber is a conductive material and would likely result in interesting failure-modes if allowed to sink battery-current across the arm. The power-supply for the ESC's are soldered directly to a wire-harness that is sandwiched in between the two sections of the bottom-assembly of the ZMR-frame.
I built a custom wire-harness for power-distribution; using 4mm2 silicone wire. Simply attach an XT60 connector to one end of the wires. Then take the bottom-plate with the motor-arms secured in place with a few loose screws. Make sure wire-length is sufficient and figure out where to strip some silicone off the main cables so as to be able to solder the ESC-powerleads to the main cabling. Be sure to NOT forget to put shrink-tubing around the section where the solder is. Be smart and slide it around the wire *before* you solder (if required). Covering the solder-joint with tubing only works if the soldered wires are soldered 'flat' against the wire, letting the leads stick out at an angle. See [this build] for a good idea of what's required. I let a set of 3.5mm bullet-connectors stick out at the end, allowing for adding hardware later. This already was superbly useful for hooking up the battery-voltage monitoring feature of the NAZE32 board. I expect to connect LED's to this connector, later, too.
Once the bottom plate and the motor-arms have been prepared, it is a question of finding a good spot for all the rest of the parts on the frame. My choices were:
- Flight controller in the middle bottom. Standard orientation
- Bluetooth module at the bottom-back, antenna-section sticking out for better reception
- D4R-II transmitter at the top-front; antenna's sticking out in 'V' shape at the top using some tie-rips and shrink-tubing.
- FPV-transmitter at the top-back; lightly tie-ripped to allow moving in case of crash.
- 5.8Ghz cloverleaf stuck out the back; bent upwards using tie-rip assembly for proper orientation.
- FPV-power-connector (balance-plug) at top-middle; tie-ripped in place to allow for battery to be connected at the side; out of the way of propellors
- Battery-lead sticking out at the back; long enough to be threaded into the frame.
- Battery mount on the top-back of the aircraft; wires at the *FRONT*; allowing for easy connecting of FPV and leading wires through the side and back of the aircraft to keep them out of the way of the propellors.
- Velcro strips used to secure battery.
- No OSD yet. Space reserved and bottom-front of aircraft or possibly 'behind' FPV-powerconnector.
Total weight without battery: 382 grams
The setup
The system runs the [CleanFlight-firmware] which is a fork of the original [BaseFlight-firmware] that typically comes with the Naze boards. CleanFlight was started with the intention to allow it to run on similar compatible STM-based boards, to clean up and modularize the code and to add more features more conveniently.
The configuration works with a special Chrome-App called 'CleanFlight-UI' , which in turn is a form of the 'BaseFlight-UI' app.
The NAZE32 has two hardware serial ports and the option for two 'software serial' ports as long as you have a PPM-sum receiver connected; freeing up a lot of extra pins. I connected the D4R-II 'FrSky' telemetry to the first hardware-serial port which has a special inverted pin available on the NAZE32 to make it directly compatible. The second hardware-serial port is set up to provide MSP functionality which means you can configure the board with it. It's connected to a HC-06 bluetooth module that allows CleanFlight-UI to connect to it.
Battery-voltage is connected to the VBatt connection on the NAZE32, making it capable of reporting battery-voltage via telemetry and/or (future) OSD as well as a beeper.
The setup of PID's is/was as simple as choosing 'Pid controller 0' and setting up some switches/controls to allow putting the aircraft into 'horizon' mode and 'autotune' mode. Then following the autotune procedure as documented in various places on the internet seems to provide quite stable flying characteristics. Sadly, yaw-rate and angle-limits need to be adjusted quite a bit to
The future
Add OSD
Currently waiting for a 'Micro MinimOSD' board. This thing's about half the size of the normal MinimOSD board I have laying at home. The aircraft flies fine without one, so havent added it to it, yet.
Fly FPV
So, I havent actually flown FPV yet before. This aircraft will be my training-copter and will likely suffer a lot because of that. Likely it will end up costing 40+ props and will lead to a new set of 'Learning to Fly' articles.
Create a better groundstation
My FPV-setup consists of a 5.8Ghz diversity-antenna receiver with 32-channels. It is hooked up to the well-known Quanum DIY FPV-goggles which is basically a creatively shaped set of styrofoam around a dashboard-screen; combined with a fresnel-lens.
I aim to make a more robust setup out of the FPV goggles that allow me to hook everything up with the minimum of fuss and wires. This will involve re-doing power and video cabling in such a way that it all fits on a cap or hat or other head-mounted assembly in some way.
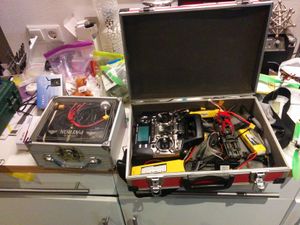
A second/seperate idea is to create a box-shaped device that mounts onto a tripod that contains all parts (except headset) for the FPV setup. This means that it will be a self-contained system with antenna's sticking out, controls accessible and with ports for plugging in the headset; mounted onto my Manfrotto-tripod with the usual hot-shoe attachment for easy setup/breakdown. Perhaps have it also be the carrying-case for the FPV-goggles themselves.
Future additions might involve an antenna-tracker , too.

