Difference between revisions of "Techinc Wheel"
m |
m (update techinc wheel project) |
||
| Line 23: | Line 23: | ||
==== Hardware components ==== | ==== Hardware components ==== | ||
| + | For the wheel | ||
* [https://www.adafruit.com/products/285#Description 12V RGB LED strip] (needs extra stuff to make it addressable) | * [https://www.adafruit.com/products/285#Description 12V RGB LED strip] (needs extra stuff to make it addressable) | ||
| + | * 60 [https://www.adafruit.com/products/1378 WS2811 chips] | ||
| + | * Arduino (diecisomething and a nano) | ||
| + | * 12V adapter | ||
| + | * capacitor and resistor smd set for about 20 rgb-led-sets - ''ordered on 28-12-2013'' | ||
| + | |||
| + | Test stuff | ||
* about 60 5mm common anode RGB LEDs | * about 60 5mm common anode RGB LEDs | ||
| − | |||
* 5V RGB LED strip (addressable, needs more powerful adapter) | * 5V RGB LED strip (addressable, needs more powerful adapter) | ||
| − | |||
| − | |||
* [http://www.re-innovation.co.uk/web12/index.php/en/products-2/rgb-led-shield-product RGB LED arduino shield] | * [http://www.re-innovation.co.uk/web12/index.php/en/products-2/rgb-led-shield-product RGB LED arduino shield] | ||
| + | * 5V adapter | ||
Lesson 1: the 12V LEDs are not addressable | Lesson 1: the 12V LEDs are not addressable | ||
| Line 38: | Line 43: | ||
* Use *addressable* RGB LEDs (WS2801 or WS2811). This is the easiest way to make it work. I currently have 30 LEDs of the WS2811 type at home. Maybe use these. | * Use *addressable* RGB LEDs (WS2801 or WS2811). This is the easiest way to make it work. I currently have 30 LEDs of the WS2811 type at home. Maybe use these. | ||
| − | + | ''We are going to use the 12V LED strip with the WS2811 chips, and make pcb's for that'' | |
| + | |||
| + | Learn how to make a PCB design, make a pcb according to the example in the [https://www.adafruit.com/datasheets/WS2811.pdf datasheet] | ||
* [http://www.kicad-pcb.org/display/KICAD/KiCad+Documentation KiCad getting started guide] | * [http://www.kicad-pcb.org/display/KICAD/KiCad+Documentation KiCad getting started guide] | ||
* [http://per.launay.free.fr/kicad/kicad_php/composant.php Component libraries] | * [http://per.launay.free.fr/kicad/kicad_php/composant.php Component libraries] | ||
| + | |||
| + | PCB for connecting a 5mm RGB LED or a 12V RGB LED strip (layout is the same, only the resistor values are different, and the connector pads/holes) | ||
| + | ** schematic of the PCB is done ([https://github.com/techinc/wheel git]) | ||
| + | ** to do: draw footprints for the data connectors and for the RGB LED connections | ||
| + | ** to do: make layout for the PCB | ||
| + | ** etch a prototype | ||
| + | ** order definitive pcb | ||
==== Software ==== | ==== Software ==== | ||
Revision as of 20:59, 29 December 2013
| Projects | |
|---|---|

| |
| Participants | Narya |
| Skills | Electronics, Mechanics |
| Status | Active |
| Niche | Electronics |
| Purpose | Promotion |
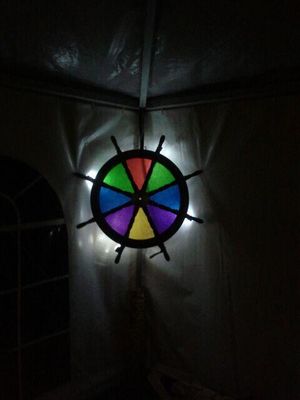
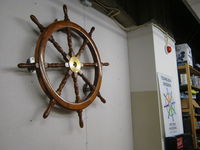
Formerly known as ARTS: Auto stereoscopic Rainbow glowing TechInc logo Steering wheel
Contents
Code
PCB layout and code for the LEDs - work in progress
Things to make and do
This project has several parts: backlit the wheel, mount the wheel to the wall or on some stand, and make the wheel control something. It would be nice to be able to unmount the wheel and take it somewhere else, e.g. to display it at events like OHM.
Painting
Who: Narya
- NO color painting!
- I will fix the scratched parts with varnish
Backlit
Who: Narya, Brainsmoke and Mariejel
Hardware components
For the wheel
- 12V RGB LED strip (needs extra stuff to make it addressable)
- 60 WS2811 chips
- Arduino (diecisomething and a nano)
- 12V adapter
- capacitor and resistor smd set for about 20 rgb-led-sets - ordered on 28-12-2013
Test stuff
- about 60 5mm common anode RGB LEDs
- 5V RGB LED strip (addressable, needs more powerful adapter)
- RGB LED arduino shield
- 5V adapter
Lesson 1: the 12V LEDs are not addressable
And now what?
- Cut current strip to even smaller pieces and use WS2801's or WS2811's for every pixel you want to address. Or, use the current set-up in another project (space lighting or something like that, where you just have one colour for the entire thing, e.g. in combination with this color sensor, in house)
- We also have RGB LEDs (5mm). Build one small board for every pixel. Takes a long time, but might be fun. (needs: WS2811/WS2801 chips, resistors, board)
- Use *addressable* RGB LEDs (WS2801 or WS2811). This is the easiest way to make it work. I currently have 30 LEDs of the WS2811 type at home. Maybe use these.
We are going to use the 12V LED strip with the WS2811 chips, and make pcb's for that
Learn how to make a PCB design, make a pcb according to the example in the datasheet
PCB for connecting a 5mm RGB LED or a 12V RGB LED strip (layout is the same, only the resistor values are different, and the connector pads/holes)
- schematic of the PCB is done (git)
- to do: draw footprints for the data connectors and for the RGB LED connections
- to do: make layout for the PCB
- etch a prototype
- order definitive pcb
Software
- FastSPI library https://code.google.com/p/fastspi/
- Neopixel library https://github.com/adafruit/Adafruit_NeoPixel
- Take a look at: ShiftPWM http://www.elcojacobs.com/using-shiftpwm-to-control-led-strips-with-arduino/
- Related projects @techinc: LEDLightDistrict, Neopixel
Design a few patterns for the wheel
- Info about colors on Wikipedia
- Make a plan for controlling the lights, ideas:
- No rotation: colors of logo
-
Rotation: full color SpokePOV (PimpMyBike blog)- based on comments: maybe not such a good idea, since wheel has to spin fast - From center to outside and vice versa
- Rotating colors
- ...
Mount
Who: justa, narya, control-k
- Location: on the wall - done
Control
Who: you?
Random ideas, feel free to add your ideas below and add your name if you like to work on it
-
Make something that registers when the wheel is turned -
Let it control X when the wheel is turned (don't know what "X" should be, ideas are welcome) -
No function, just let it rotate - For now: no rotation
