Difference between revisions of "Memberbox DIY"
m (→Workshop day 1: evaluation) |
|||
| (2 intermediate revisions by the same user not shown) | |||
| Line 1: | Line 1: | ||
{{Project | {{Project | ||
| + | |picture=IMG_20160921_205754x.jpg | ||
|ProjectSkills=woodworking | |ProjectSkills=woodworking | ||
| − | |ProjectStatus= | + | |ProjectStatus=Dead |
| + | |ProjectNiche=Mechanics | ||
|ProjectPurpose=Fun | |ProjectPurpose=Fun | ||
}} | }} | ||
Latest revision as of 22:30, 19 December 2019
| Projects | |
|---|---|

| |
| Participants | |
| Skills | woodworking |
| Status | Dead |
| Niche | Mechanics |
| Purpose | Fun |
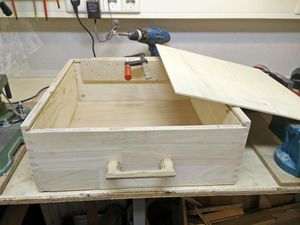
creating memberboxes from scratch
Contents
Measurement of available storage shelves; ideal dimensions
We went and measured the current situation.
depth: 470mm (exact)
width: 965mm (between the verticals)
remaining width next to two Lips boxes: 470mm
shelf height suited for next-largest box: 180mm
So, the 'safe' width is say 430-450 mm, the ideal depth is 450-470 mm. The 'safe' height is 165 mm.
I would therefore suggest to manufacture boxes that fit neatly next to two lips boxes; this means a depth of ~460 mm and a width of ~440 mm and height of 165mm including lid.
Source material
To get that out of a standard sheet; you can get 4x 470mm out of 2440 and you'll be left with a piece of ~540mm. This is not unsuited to make lids (if the lid is made with the same 'thick' plywood/MDF); it has a few cm oversize so that'll account for saw cut widths and spill in box joints.
If we ignore the bottom and the lid for now, we can cut 7 sets of 165mm-height boxes from one sheet. To accomplish that though, we must not have transport-cut the sheet in exactly half, but at an offset. Either lengthwise or across. If lengthwise, the two planks have to be cut at a multiple of 170mm, so most logical is 510mm + 710mm, or 680mm + 540mm If cut across, it would have to be at about 910mm +-10mm, or 1360mm +- 10mm,
From the excess piece you can at most make two lids since 1220mm does not accommodate 450mm more than twice.
If a sliding lid is used, this isn't a problem; for that we'll use thin material. For more solid lids this can be a concern. A sliding lid we'd likely make from 3-5mm triplex.
Suggested workflow
All other things notwithstanding, it is very advantageous to only dial in a setting on a saw table or router table once. This way you work efficiently, and you get reproducible results. So our workflow should ideally follow that; make all cuts in one go, where applicable.
Achievement unlocked: we cut 4 sets of sides in one go, width and length, to be able to build 4 boxes. Unfortunately, less people showed up than were expected, so the planks are waiting and ready for the next workshop day.
Suggested material
Admittedly, I [ultratux] was never a great friend of MDF. I also realize wooden boxes will be significantly heavier than plastic ones. So I will most likely go for relatively thin/light wood without compromising on strength. So for me, plywood is the choice material. Likely 9mm width but I'd have to see the list. MDF is the other likely option, but as I said I don't think it is what I'd choose...
Best/nicest would be massive hardwood but I think neither our skillset nor our tooling equipment is ready yet to use that, and moreover, budget would not allow for that by a big margin.
Workshop day 1: evaluation
Here's our preliminary results so far: https://pbs.twimg.com/media/CslHnAGXgAAqA_J.jpg
The highlights of today:
1) We changed our material choice when we saw the planks/flooring justa kindly provided so instead of plywood or MDF we used that. It's laminated natural wood, looks nicer. We luckily avoided some potential pitfalls associated(*) with this type of laminate, and fared fairly well.
2) Great care must be taken to check that no debris lodge under the boxcutter 'saddle'. If that happens you'll see that the vertical alignment of your material is off but only if you focus on checking that.
3) There was a close call type accident. A few important lessons we can draw from that: DO take the effort to lower the saw blade into the table when you utilize the router(!!). DO watch what device you turn on. DON'T rush, wait until the situation returns to safe when an error has been made. And lastly; the power switches being further apart might have been a safer option; we'll adapt.
4) A larger endstop/edge on the boxcutter saddle would enable us to cut two pieces simultaneously; theoretically doubling the speed of the work. This would be a worthwhile improvement.
(*) Like spontaneous delamination, especially due to humidity. Or having a too-narrow cut so the wood piece falls out or breaks off. Also, the inner layers have sometimes big open gaps that'll need filling up.