Difference between revisions of "Drone 1-2-3"
Cyberdutch (talk | contribs) |
Cyberdutch (talk | contribs) |
||
| (37 intermediate revisions by the same user not shown) | |||
| Line 1: | Line 1: | ||
{{Project | {{Project | ||
|ProjectSkills=RC planes, Arduino | |ProjectSkills=RC planes, Arduino | ||
| − | |ProjectStatus= | + | |ProjectStatus=Dormant |
|ProjectNiche=Electronics | |ProjectNiche=Electronics | ||
|ProjectPurpose=Fun | |ProjectPurpose=Fun | ||
| Line 84: | Line 84: | ||
Specs micro Blue Bird BMS-306BB servos (2x 6.91gr): | Specs micro Blue Bird BMS-306BB servos (2x 6.91gr): | ||
| − | torque 1.1kg/cm, speed 0. | + | torque 1.1kg/cm, speed 0.10s/60deg |
| Line 104: | Line 104: | ||
For park flying: Near the [http://www.openstreetmap.org/?mlat=52.3647&mlon=4.8131#map=16/52.3647/4.8131 Sloterplas, Amsterdam] | For park flying: Near the [http://www.openstreetmap.org/?mlat=52.3647&mlon=4.8131#map=16/52.3647/4.8131 Sloterplas, Amsterdam] | ||
| − | === April 6, 2016 - Currently flying is banned from the Sloterplas location. See: | + | === April 6, 2016 - Currently flying is banned from the Sloterplas location. See: [https://wiki.techinc.nl/index.php/Drone_1-2-3#Jun_15.2C_2017_-_Complying_with_the_Latest_Drone_Flying_Rules Complying with the Latest Drone Flying Rules] |
For slope soaring not far from Amsterdam: [http://www.openstreetmap.org/?mlat=52.43734&mlon=4.80480#map=17/52.43734/4.80480, Zaandam (De Belt)] or [http://www.openstreetmap.org/?mlat=52.40015&mlon=4.66652#map=17/52.40015/4.66652 Haarlemmerliede (Mooie Nel)] | For slope soaring not far from Amsterdam: [http://www.openstreetmap.org/?mlat=52.43734&mlon=4.80480#map=17/52.43734/4.80480, Zaandam (De Belt)] or [http://www.openstreetmap.org/?mlat=52.40015&mlon=4.66652#map=17/52.40015/4.66652 Haarlemmerliede (Mooie Nel)] | ||
| + | |||
| + | === April 29, 2017 - Currently flying is banned from both De Belt and Mooie Nel. See: [https://wiki.techinc.nl/index.php/Drone_1-2-3#Jun_15.2C_2017_-_Complying_with_the_Latest_Drone_Flying_Rules Complying with the Latest Drone Flying Rules] | ||
| + | |||
For excellent slope soaring in the Netherlands: [http://www.openstreetmap.org/?mlat=51.4962&mlon=3.4951#map=16/51.4962/3.4951 Zeeland (Zoutelande)] (with south-west facing dunes of 30-50m high). This flying site is over 2hrs from Amsterdam, but with a season-discount-ticket from the NS the distance is (money wise) only 16 euros for a return ticket | For excellent slope soaring in the Netherlands: [http://www.openstreetmap.org/?mlat=51.4962&mlon=3.4951#map=16/51.4962/3.4951 Zeeland (Zoutelande)] (with south-west facing dunes of 30-50m high). This flying site is over 2hrs from Amsterdam, but with a season-discount-ticket from the NS the distance is (money wise) only 16 euros for a return ticket | ||
[https://player.vimeo.com/video/131479926/ vimeo.com: Highest dunes in the Netherlands] The Dutch dunes in Zoutelande and Schoorl stand taller than 50m. Still very modest, compared to Big Daddy in Namibia, which measures a whopping 325m. | [https://player.vimeo.com/video/131479926/ vimeo.com: Highest dunes in the Netherlands] The Dutch dunes in Zoutelande and Schoorl stand taller than 50m. Still very modest, compared to Big Daddy in Namibia, which measures a whopping 325m. | ||
| + | |||
=== Dec 7, 2015 - A new spot can be added for flying with south wind: [http://www.openstreetmap.org/?mlat=51.9174&mlon=4.0004#map=14/51.9174/4.0004 Maasvlakte (Slufter)]. The Maasvlakte area has (artificial) dunes that work for many wind directions. It's an industrial development that's part of Port of Rotterdam. | === Dec 7, 2015 - A new spot can be added for flying with south wind: [http://www.openstreetmap.org/?mlat=51.9174&mlon=4.0004#map=14/51.9174/4.0004 Maasvlakte (Slufter)]. The Maasvlakte area has (artificial) dunes that work for many wind directions. It's an industrial development that's part of Port of Rotterdam. | ||
| Line 145: | Line 149: | ||
| − | Today Drone 1-2-3 was flown at 2-3 Beaufort (5.5-19.7 | + | Today Drone 1-2-3 was flown at 2-3 Beaufort (5.5-19.7 kph) northerly winds from the [http://www.openstreetmap.org/?mlat=52.40015&mlon=4.66652#map=17/52.40015/4.66652 Mooie Nel] hill (25m high) in Haarlemmerliede. |
| Line 176: | Line 180: | ||
After the hardware modifications were done, ArduPlane firmware was installed at the Mini APM v3.1: | After the hardware modifications were done, ArduPlane firmware was installed at the Mini APM v3.1: | ||
| − | First, [http://ardupilot. | + | First, [http://firmware.eu.ardupilot.org/Tools/MissionPlanner/ Mission Planner] software was downloaded and installed on a desktop computer and from there off ArduPlane v3.2 firmware was uploaded and installed onto the Mini APM. After finishing this, its on-board LEDs confirmed a correct install :-) |
| − | Detailed instructions for installing the firmware and working with Mission Planner can be found at the [http:// | + | Detailed instructions for installing the firmware and working with Mission Planner can be found at the [http://ardupilot.org/plane/docs/arduplane-setup.html ArduPilot website]. |
| Line 222: | Line 226: | ||
Except for the Airspeed meter, all the separate hardware parts have been put together and were transferred into one single nervous system. | Except for the Airspeed meter, all the separate hardware parts have been put together and were transferred into one single nervous system. | ||
| − | Now, the parts are successfully communicating with the [http:// | + | Now, the parts are successfully communicating with the [http://ardupilot.org/planner/docs/mission-planner-overview.html Mission Planner] software, with the RC transmitter, and with each other. |
| Line 334: | Line 338: | ||
In light winds and stable air the preferred speed of Drone 1-2-3 is V-minimum-sink. This is the speed at which the aircraft is losing the least altitude in a given amount of time in dead air. It's a good speed to fly in lift areas for maximum altitude gain. Minimum sink is found just a bit above stall speed, | In light winds and stable air the preferred speed of Drone 1-2-3 is V-minimum-sink. This is the speed at which the aircraft is losing the least altitude in a given amount of time in dead air. It's a good speed to fly in lift areas for maximum altitude gain. Minimum sink is found just a bit above stall speed, | ||
| − | My estimated V-minimum-sink for Drone 1-2-3 was approximately | + | My estimated V-minimum-sink for Drone 1-2-3 was approximately 24kph, at a sink of around 0.6m/s. |
I assumed a glide angle of approximately -3deg would result in this speed. | I assumed a glide angle of approximately -3deg would result in this speed. | ||
| Line 343: | Line 347: | ||
V-max-[https://en.wikipedia.org/wiki/Lift-to-drag_ratio L/D] is the speed at which a glider will cover the most distance from a given altitude. The speed with the best best glide ratio. This is generally a slightly higher speed than V-minimum-sink. So, a shorter flight time, but you go farther, maybe reaching a landing area that is free of obstacles instead of landing out in the trees... | V-max-[https://en.wikipedia.org/wiki/Lift-to-drag_ratio L/D] is the speed at which a glider will cover the most distance from a given altitude. The speed with the best best glide ratio. This is generally a slightly higher speed than V-minimum-sink. So, a shorter flight time, but you go farther, maybe reaching a landing area that is free of obstacles instead of landing out in the trees... | ||
| − | My estimated V-max-L/D for Drone 1-2-3 was approximately | + | My estimated V-max-L/D for Drone 1-2-3 was approximately 29kph, at a glide ratio of 13:1 |
I assumed a glide angle of approximately -4deg would result in this speed. | I assumed a glide angle of approximately -4deg would result in this speed. | ||
| Line 428: | Line 432: | ||
Weather conditions were excellent. | Weather conditions were excellent. | ||
| − | A south west wind of 16- | + | A south west wind of 16-24kph (3-4bft) was measured on top of the dune. So, wind speed should be somewhat lower further away from the ridge due to the absence of any venturi-effect on passing airflow. |
Take off and flying went great. What a lift! | Take off and flying went great. What a lift! | ||
| Line 441: | Line 445: | ||
| − | (Dutch | + | (Dutch TOP25raster maps are available under CC-BY-4.0 licence:) |
[[File:zoutelandekruit2.png|800px]] | [[File:zoutelandekruit2.png|800px]] | ||
| Line 462: | Line 466: | ||
- Change/repair the broken servo | - Change/repair the broken servo | ||
| − | ==== Check! Nov 12, 2015: 3hrs of flying fun at the flying spot in [http://www.openstreetmap.org/?mlat=52.43746&mlon=4.80545#map=17/52.43746/4.80545, Zaandam (De Belt)]. Spread over about 20 flights of 3-20min each with approximately 22- | + | ==== Check! Nov 12, 2015: 3hrs of flying fun at the flying spot in [http://www.openstreetmap.org/?mlat=52.43746&mlon=4.80545#map=17/52.43746/4.80545, Zaandam (De Belt)]. Spread over about 20 flights of 3-20min each with approximately 22-30kph westerly winds (4bft). Not a large place, surrounded by water, a little gusty, some turbulence. Navigating the plane was quiet a challenge for me. It would be much more difficult to fully automate this task for an area like this, as compared to Zoutelande. Flying at De Belt hasn't bored me a minute :-) |
[[File:debelttop25raster.png|275px]] | [[File:debelttop25raster.png|275px]] | ||
| − | (Source: | + | (Source: TOP25raster maps) |
| − | === Check! Nov 23, 2015 - A flight of 1:09hr was clocked during the second visit to Zoutelande. The south west breeze of 32- | + | === Check! Nov 23, 2015 - A flight of 1:09hr was clocked during the second visit to Zoutelande. The south west breeze of 32-38kph (5bft) generated so much lift that day, that it was even difficult to convince Drone 1-2-3 that it was time to land. Flying circles above the sea and when low enough returning to the beach for landing, did the trick. |
| − | === Check! Dec 7, 2015 - A flight of 2:55hr was clocked during the first flying session at the [http://www.openstreetmap.org/?mlat=51.9174&mlon=4.0004#map=14/51.9174/4.0004 Maasvlakte (Slufter)]. The moderate south breeze of 25- | + | === Check! Dec 7, 2015 - A flight of 2:55hr was clocked during the first flying session at the [http://www.openstreetmap.org/?mlat=51.9174&mlon=4.0004#map=14/51.9174/4.0004 Maasvlakte (Slufter)]. The moderate south breeze of 25-33kph (4-5bft) provided smooth lifting air that day. |
[[File:timestamp.jpg|275px]] | [[File:timestamp.jpg|275px]] | ||
| Line 478: | Line 482: | ||
- Calibrate and implement the airspeed meter | - Calibrate and implement the airspeed meter | ||
| − | === Dec 5, 2015 - The attempts to calibrate the airspeed meter solely from a construction on the front of my bicycle didn't work out well. To get reliable results, more data are needed over a greater (and higher) speed range. Hanging the airspeed meter out of a car window on the highway went better. It produced usable data over the 60- | + | === Dec 5, 2015 - The attempts to calibrate the airspeed meter solely from a construction on the front of my bicycle didn't work out well. To get reliable results, more data are needed over a greater (and higher) speed range. Hanging the airspeed meter out of a car window on the highway went better. It produced usable data over the 60-120kph speed range. |
| − | Next step is to get back on the bike and fill in the data over the 0- | + | Next step is to get back on the bike and fill in the data over the 0-60kph speed range. A speed range that is closer to Drone 1-2-3's normal flying speeds. |
[[File:bike.jpg|225px]] [[File:pitot.png|225px]] | [[File:bike.jpg|225px]] [[File:pitot.png|225px]] | ||
| Line 491: | Line 495: | ||
it's hard to get consistent readings, and hence difficult to calibrate the airspeed meter around the most relevant airspeeds. | it's hard to get consistent readings, and hence difficult to calibrate the airspeed meter around the most relevant airspeeds. | ||
| − | At slow airspeeds e.g. around stall & minimum sink ( | + | At slow airspeeds e.g. around stall & minimum sink (24kph), the speed curve of differential (pitot) pressure KPa (Y-axis) versus airspeed kph (X-axis) becomes almost flat. |
Moreover, there is drift of and temperature influence on the used analog MPXV7002 sensor that have significant impact on KPa readings as well. | Moreover, there is drift of and temperature influence on the used analog MPXV7002 sensor that have significant impact on KPa readings as well. | ||
| Line 510: | Line 514: | ||
| − | == | + | == Jun 15, 2017 - Complying with the Latest Drone Flying Rules == |
| + | |||
| + | The Dutch regulator implemented new strict rules for remotely piloted light aircraft. | ||
| + | |||
| + | Unfortunately, drone flying is banned from some of my favorite sites now :-( | ||
| + | |||
| + | Mooie Nel, De Belt and the Sloterplas flying sites are in the Amsterdam/Schiphol CTR. Flying at these places is not allowed or tolerated anymore (See maps below). | ||
| + | |||
| + | |||
| + | [[File:amsterdam_ctr_outside_ring-drone.png|650px]] | ||
| + | |||
| + | [[File:amsterdam_ctr_restrict1.png|650px]] | ||
| + | |||
| + | |||
| + | Flying is still legal at [https://wiki.techinc.nl/index.php/Drone_1-2-3#Oct_4.2C_2015_-_First_flight_at_Zoutelande Zoutelande] and at the [http://www.openstreetmap.org/?mlat=51.9174&mlon=4.0004#map=14/51.9174/4.0004 Maasvlakte (Slufter)]. | ||
| + | |||
| + | But you'll have to deal with the new rules: | ||
| + | |||
| + | |||
| + | To the best of my knowledge flying with light (less than 4kg) drones or remote controlled aircraft without holding any permits or licenses is allowed in the Netherlands if the following conditions are met: | ||
| + | |||
| + | - Fly during the daylight period | ||
| + | |||
| + | - No flying in built-up areas | ||
| + | |||
| + | - More than 50m from roads or buildings | ||
| + | |||
| + | - More than 150m from people or rail tracks | ||
| + | |||
| + | - Fly less than 50m above ground level | ||
| + | |||
| + | - The person who controls the drone must have it in sight at all times (no FPV) and at a distance of less than 100m | ||
| + | |||
| + | - Only fly when there is no manned aircraft nearby (if so, land immediately) | ||
| + | |||
| + | - Stay more than 3km away from (uncontrolled) airfields and no-fly zones | ||
| + | |||
| + | - No flying near CTRs of airtraffic controlled airports | ||
| + | |||
| + | |||
| + | === New Flying sites === | ||
| − | + | Finding new flying sites in the Netherlands is quite a challenge. | |
| + | The dune area near Zandvoort aan Zee offers good stable conditions with W to NW wind directions. | ||
| + | Also, the ski hill near Nieuwegein could work really well with a westerly wind. | ||
| − | + | The Amsterdam flying club [http://www.modelvliegclubicarus.nl/ Icarus] has a long standing agreement with the Dutch regulator to fly under strict rules at their airfield near Ruigoord on the far west outskirts of Amsterdam. | |
| + | It has no hills that support slope soaring, but it offers a nice site for short test flights in the Amsterdam CTR. | ||
| + | To fly at this privileged place, you'll need to become a member of Icarus and of course follow their rules. | ||
| − | + | Icarus consists of a group of relaxed friendly model aircraft enthusiasts and is open for new members. | |
Latest revision as of 11:58, 13 May 2019
| Projects | |
|---|---|
| Participants | Cyberdutch |
| Skills | RC planes, Arduino |
| Status | Dormant |
| Niche | Electronics |
| Purpose | Fun |
Contents
- 1 Drone 1-2-3: An autonomously flying wing glider
- 1.1 Feb 16, 2015 - R/C equipment tested - Check!
- 1.2 Feb 24, 2015 - Planned test flights (R/C) & Flying sites
- 1.3 March 17, 2015 - Some real world flying (R/C) - Check!
- 1.4 April 5, 2015 - More R/C flying, Starting with the ArduPilot hard/software & Ordering more parts
- 1.5 Putting the parts together
- 1.6 The next step
- 1.7 Aug 18, 2015 - Oops! One step back
- 1.8 A new plane battery for extended flights & ordering solar cells - Check!
- 1.9 Sep 10, 2015 - Testflights using only basic hardware components
- 1.10 Ordering a new RC-set & Invested in this project
- 1.11 Oct 3, 2015 - Short test flights with the new Tx/Rx near the Sloterplas
- 1.12 Oct 4, 2015 - First flight at Zoutelande
- 1.13 Jun 15, 2017 - Complying with the Latest Drone Flying Rules
Drone 1-2-3: An autonomously flying wing glider
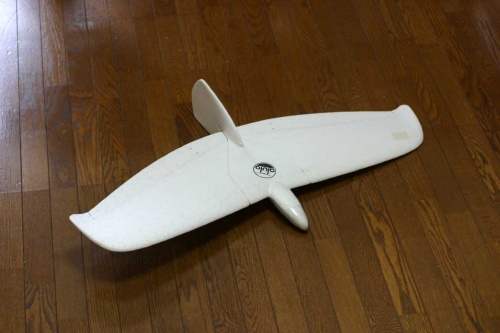
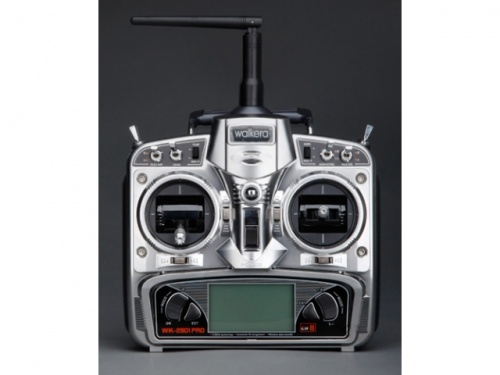
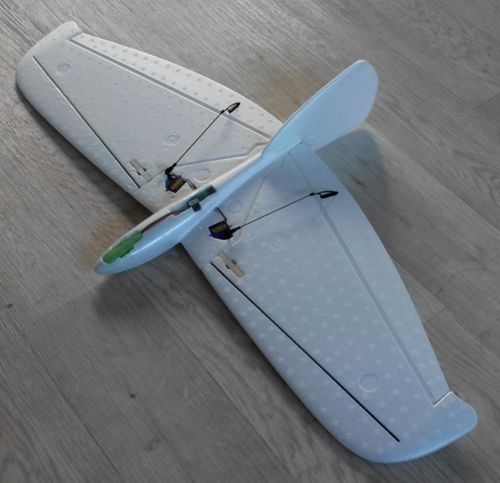
Drone 1-2-3 is a glider drone based on the Alula urban flying wing (parts already there), a Walkera WK-2801 PRO R/C (in my attic) and an Arduino based auto-pilot for stabilization and navigation.
The idea is to create a drone that can fly without any direct human intervention. Like the Indian surveillance drone that wanders the skies for years in Christopher Nolan's 2014 Sci-Fi film Interstellar.
vimeo.com: Drone Chase This is the scene where Cooper and his children, Tom and Murph, set out on a chase after this Indian drone.
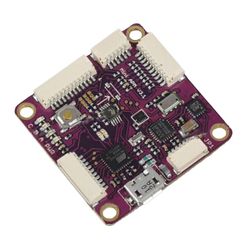
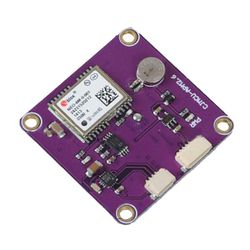
So far the only parts that needed to be ordered were: A Mini APM v3.1 (ArduPilot 2.6) and an external compass/GPS (Ublox NEO 6M GPS HMC5883L). Total costs: Less than 47 euro, including (free) shipping and (delivery free of) taxes.
Steps in this project:
1. Build the plane (trim and fly)
2. Make it remotely controlled (R/C)
3. Teach it to fly autonomously
The secondary goal of this project is: Extended flight time (longer than a day?).
The coexisting primary goals are planet domination, colonizing of space and sheer fun.
Feb 16, 2015 - R/C equipment tested - Check!
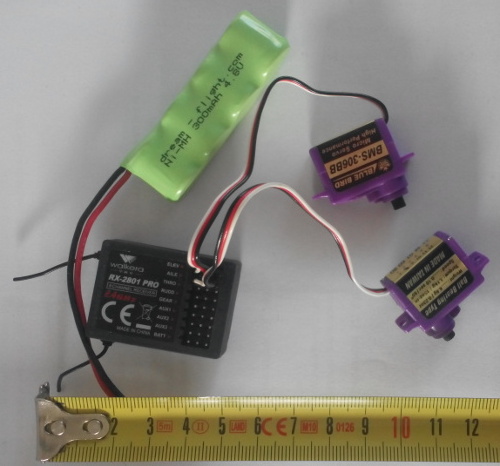
After not using it for 5 years, the Li-Po battery pack of the transmitter was showing no signs of life anymore. Luckily, I found an AA battery holder for 8 cells to replace it. For the time being that will do.
The (less critical) Ni-MH receiver battery was still in good condition. I charged/discharged it a few times and it holds approximately 286mAh x 4.8V (which is okay for an advertised nominal capacity of 300mAh).
Everything was connected, switched on, binded, and worked fine :-)
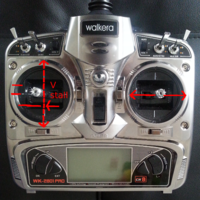
Specs Walkera WK-2801 PRO transmitter:
8-channel, 2.4G, output pulse 1100-1900Ms (1500 neutral)
100mW (10mW default) output power
230mA current drain
12V (8x 1.5V AA)
Specs Walkera RX-2801 PRO receiver (9.23g):
8-channel, 95dbm sensitivity, frequency interval >=4M
receiver battery (29.65g)
4.8V 300mAh (4x1.2V) Ni-MH
Specs micro Blue Bird BMS-306BB servos (2x 6.91gr):
torque 1.1kg/cm, speed 0.10s/60deg
Feb 24, 2015 - Planned test flights (R/C) & Flying sites
Drone 1-2-3 is now ready for some flying tests.
I plan to start teaching the drone to fly autonomously only after thoroughly being tested and tuned. It should have proven stable flying characteristics in R/C controlled mode.
Drone 1-2-3 is controlled by ailerons (roll) and elevator (pitch) combined in a 2-servo delta wing setup. Roll and pitch are mixed electronically: One servo drives the left wing control surface and one servo drives the right wing control surface.
Suitable flying sites are scarce in Holland. But there are some promising places.
For park flying: Near the Sloterplas, Amsterdam
=== April 6, 2016 - Currently flying is banned from the Sloterplas location. See: Complying with the Latest Drone Flying Rules
For slope soaring not far from Amsterdam: Zaandam (De Belt) or Haarlemmerliede (Mooie Nel)
=== April 29, 2017 - Currently flying is banned from both De Belt and Mooie Nel. See: Complying with the Latest Drone Flying Rules
For excellent slope soaring in the Netherlands: Zeeland (Zoutelande) (with south-west facing dunes of 30-50m high). This flying site is over 2hrs from Amsterdam, but with a season-discount-ticket from the NS the distance is (money wise) only 16 euros for a return ticket
vimeo.com: Highest dunes in the Netherlands The Dutch dunes in Zoutelande and Schoorl stand taller than 50m. Still very modest, compared to Big Daddy in Namibia, which measures a whopping 325m.
=== Dec 7, 2015 - A new spot can be added for flying with south wind: Maasvlakte (Slufter). The Maasvlakte area has (artificial) dunes that work for many wind directions. It's an industrial development that's part of Port of Rotterdam.
March 17, 2015 - Some real world flying (R/C) - Check!
After adding 15.74g lead to the nose, it was time for some real world flying!
Adding the lead was necessary in order to move the center of gravity forward to its proper spot near the leading edge of the wing. Later the lead can be replaced with batteries or other functional stuff. The total flying weight of the plane comes now to 158g. At a wing area of 16.7dm2, that implies a wing loading of 9.46g/dm2. The wing span of Drone 1-2-3 is 90cm.
Today in light spring air, Drone 1-2-3 made its maiden flight from the small slope near the Sloterplas.
First few radio-controlled flights were somewhat challenging. But after the Drone's pitch was properly (electronically) trimmed, flying became a breeze. I didn't need to drive the plane all by myself anymore. Drone 1-2-3 showed stable flight characteristics, and steering inputs were accepted and processed well without revolting.
April 5, 2015 - More R/C flying, Starting with the ArduPilot hard/software & Ordering more parts
More R/C flying
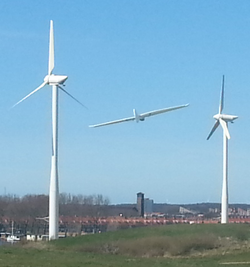
Today Drone 1-2-3 was flown at 2-3 Beaufort (5.5-19.7 kph) northerly winds from the Mooie Nel hill (25m high) in Haarlemmerliede.
Starting with the ArduPilot hard/software
With R/C flying working well it was time to start working on teaching Drone 1-2-3 to fly autonomously.
The Mini APM v3.1 (ArduPilot 2.6) and the external compass/GPS board (Ublox NEO 6M GPS HMC5883L) needed the following hardware modifications:
> Mini APM v3.1 - Disconnecting jumper 1
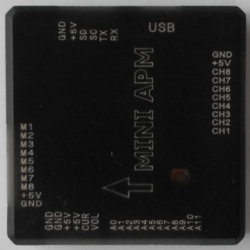
To disable the (buggy) internal compass on the main board (Mini APM v3.1) it is needed to disconnect jumper 1 (JP1). The jumper connection was broken with a small hobby knife. After that, the main board was put back in the protective case that came with it.
> External compass/GPS board - adding a 3.3V connection
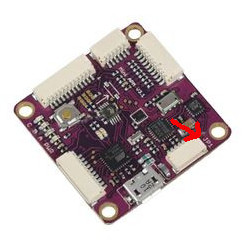
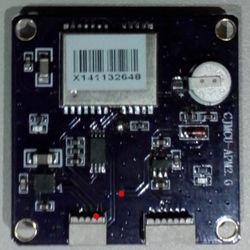
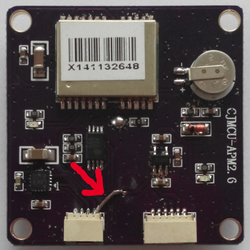
To make it possible to power the external compass, the fourth (most right) pin of the connector for the compass on the external compass/GPS board was wired to an embedded wire on the circuit board itself to connect it to +3.3V. The insulation can be scraped off the circuit board with a knife. After that, it requires some precise soldering (PCB size is 36mm x 36mm!).
The correct location on the circuit board (to connect to +3.3V) is best seen by enlarging the left picture, which shows the embedded circuit wiring best.
> Mini APM v3.1 - installing firmware
After the hardware modifications were done, ArduPlane firmware was installed at the Mini APM v3.1:
First, Mission Planner software was downloaded and installed on a desktop computer and from there off ArduPlane v3.2 firmware was uploaded and installed onto the Mini APM. After finishing this, its on-board LEDs confirmed a correct install :-)
Detailed instructions for installing the firmware and working with Mission Planner can be found at the ArduPilot website.
Ordering more parts
The standard main board (Mini APM v3.1), which will be mounted near the center of gravity of the drone, carries the following sensors:
- 3-axis gyro (an Accelerometer that measures the acceleration forces electronically along its axis)
- Magnetometer (to support the gyro - combined data are filtered to get a more precise result)
- Pressure altimeter (Barometric pressure sensor)
The external board, which will be mounted in the wing of the drone at some distance from the receiver and servo noise, carries:
- Compass
- GPS (Ublox NEO 6M GPS HMC5883L)
Since it seems useful for Drone 1-2-3 to have information about airspeed (avoiding stalls) and battery state (extended flights) on top of the flight information which is available standardly, the following extra parts were ordered this week:
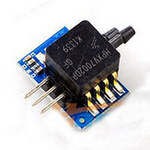
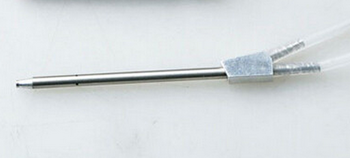
- Airspeed meter with splitter tube (compares the pressure of air blown in the pitot tube and static air)
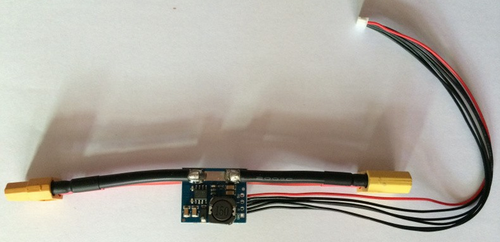
- Power supply module with (BEC) 5V regulator (also senses current and battery voltage info)
At a cost of 35.40 euro including shipping for these two parts (most of it consumed by the nifty airspeed meter), the total amount of money spent on the Drone 1-2-3 project is 82 euro so far.
Putting the parts together
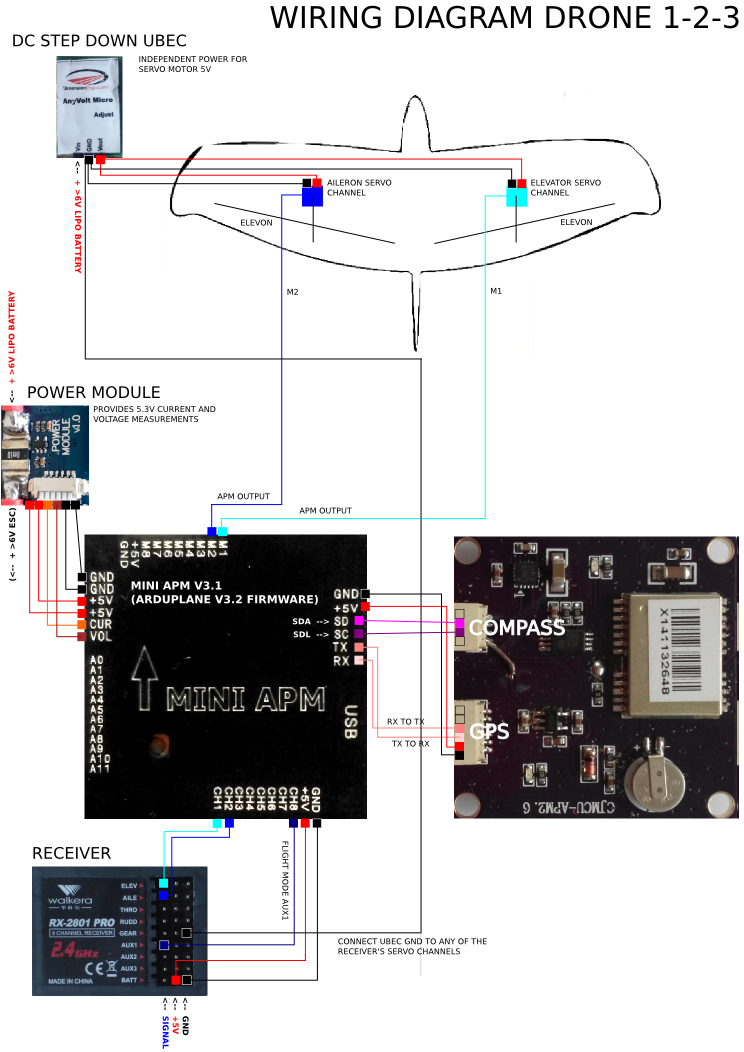
Except for the Airspeed meter, all the separate hardware parts have been put together and were transferred into one single nervous system. Now, the parts are successfully communicating with the Mission Planner software, with the RC transmitter, and with each other.
The next step
When embedding the hardware into Drone 1-2-3's wing is finished, the project will move from indoor hardware centered to outdoor software centered.
The main focus will be on scripting and testing autonomous flying.
Aug 18, 2015 - Oops! One step back
When the Walkera transmitter and receiver are switched ON, the two do pair/bind as expected. But, often the transmitter-receiver combination becomes unstable after about half a minute for a few seconds. Then, it recovers, but leaves the auto-pilot system (APM and GPS/Compass) in a permanent confused state. It looks as if this problem has to do with an excessive power drain during these seconds.
After reconnecting and testing the hardware several times using only basic hardware components (no compass or GPS), I found a quick and dirty solution. If the Mini APM is fed from an independent power source during its "unstable seconds", it doesn't become permanently confused anymore.
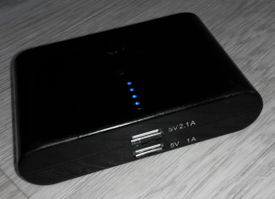
A day saver: an old USB External Powerbank Battery for a cellular phone
Now that things are working fine and can be kept that way by carrying an USB powerbank in my flight-box, I decided to continue flying and testing Drone 1-2-3 for a while using the current very basic hardware setup.
So, what are the consequences of this compass-less and GPS-less approach for autonomously flying?
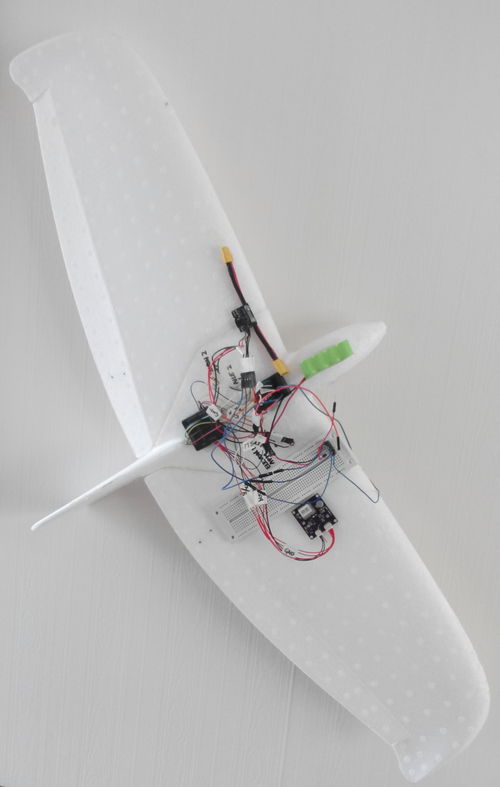
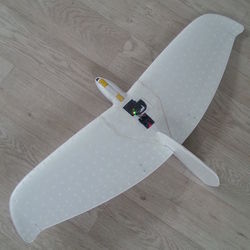
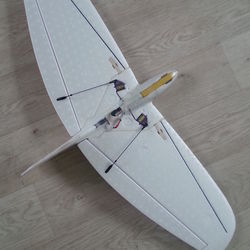
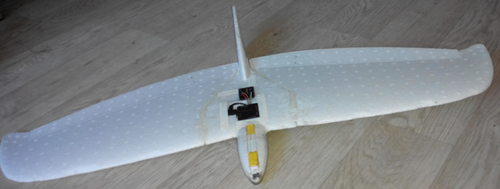
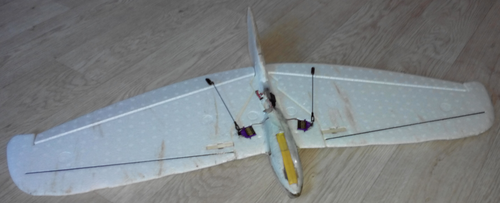
Top and Bottom view in current hardware setup
For stabilization, this is not much of a difference. The 3-axis accelerometer of the APM handles flight behavior fine. And, even without a compass, Drone 1-2-3 holds direction in an acceptable way.
For navigation, that's a different story. Its map-orientational skills are comparable to those of my mother-in-law without a TomTom. Without GPS it definitely needs some form of manual guidance.
A new plane battery for extended flights & ordering solar cells - Check!
In a further stage, I plan to have Drone 1-2-3 re-charging its on board battery by solar cells during daylight. To accommodate future flights longer than twenty-four hours, Drone 1-2-3 also needs to carry a battery that holds enough juice to keep it alive during the night.
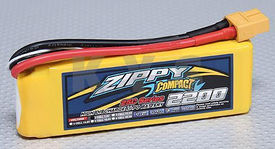
To make this possible, the standard 300mAh 30g 4.8V Ni-MH receiver battery was replaced by a Zippy 2200mAh 91g 7.4V 2s LiPo battery. I tested the new battery and it holds approximately 1740mAh x 7.4V. This is nowhere near the advertised numbers, but it is still expected to have capacity enough to keep things running until the next morning.
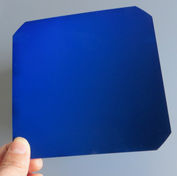
Also, I ordered some flexible Malaysian A grade C60 Monocrystalline Silicon SunPower solar cells.
They were delivered in Amsterdam for 3.15 euro per cell. If we (could) trust the manufacturer's specs of 21.8% efficiency, 0.6V and 3.3W per cell, these highly efficient cells come at less than 1 euro per Watt.
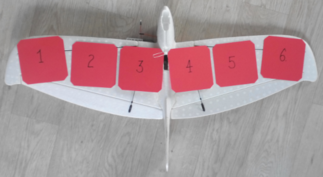
4 of these 125x125mm cells can easily be placed onto top of the plane's wing. With some modifications, 6 cells could be squeezed in.
I will bench test a setup with 6 solar cells. Power wise 4 might do, but when 6 are put in series one can expect the output voltage to be well above 2V continuously. This gives reasonable efficient voltage step-up posibilities to bring the voltage up to the needed maximum during charging of 4.2V for charging one LiPo cell at the time.
=== Dec 7, 2015 - To step-up these low voltage numbers and at the same time not losing too much Amps, I'll use Maxim Integrated's MAX1703 chip.
The on board Zippy 7.4V LiPo has two 3.7V cells (2s). My idea is to charge LiPo-cell-1 for a very short period of time, then (disconnect and) switch to LiPo-cell-2 for about the same time, then back to LiPo-cell-1, and keep repeating the process. By keeping track of the voltage per cell, the battery can be balanced at the same time.
Sep 10, 2015 - Testflights using only basic hardware components
Last week many testflights were done in the basic hardware setup of Aug 18. In this setup, the new plane battery for extended flights is already replacing the old receiver battery and some previously added lead. The total weight of Drone 1-2-3 is now 181g.
Points of departure
All flying is done in Fly-By-Wire mode: The Drone 1-2-3 is completely on its own for stabilization. R/C equipment is solely used for navigation purposes and for occasional adjustment of airspeed.
Without touching the R/C transmitter, the on board APM will continuously check for any change in attitude and if necessary it will correct immediately by moving:
1. Ailerons (roll); to move the wings back where they belong; perfectly aligned with the horizon.
2. Elevator (pitch); to move the nose back where it belongs; so that the fuselage follows the proper preset glide angle, resulting in the proper airspeed.
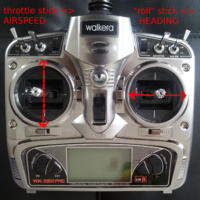
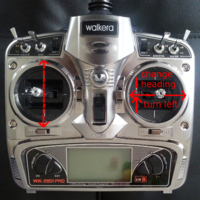
In this setup there are two input channels that we can use on the transmitter. The throttle stick, that I assigned to speed adjustment, and the "roll" stick that is used to change heading.
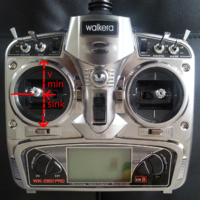
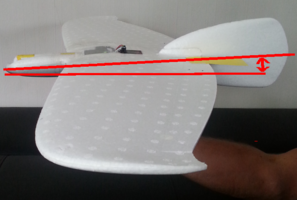
The throttle stick can only move forward, backward and vice versa, and is the only stick that has no spring or tendency to move towards a neutral position. Normally it controls engine RPM. At Drone 1-2-3 it is used to adjust its glide angle in degrees, and this way it indirectly controls its airspeed. Throttle position (airspeed) is set before take-off. During flight we have a possibility to alter or fine-tune this.
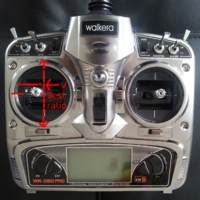
The "roll" stick can only move from left to right and vice versa, and automatically jumps back to a neutral position when letting go. Normally it controls the ailerons. In our case it controls the turning ratio: This is the aircraft's change of compass heading in a given amount of time. If not touched, the plane will keep its current direction of flight. If moved (completely) to the left, the plane will bank its wings to the left at an angle of 28deg resulting in a constant turn ratio. It holds this banking position until we let the stick go. Then, the stick will jump back to neutral and the plane will align its wings with the horizon again and Drone 1-2-3 will keep its new direction of flight. This works the same for right turns.
More on speed control and stalling risk
In this setup, speed is controlled by the plane's attitude. In normal flying circumstances this is expected to work okay.
In a future setup, I plan to use the airspeed meter with splitter tube as well. This meter can give direct feedback on the actual airspeed. If a sudden drop in airspeed is noted, the APM can have the plane immediately dive-up speed. This way there is less risk on unplanned stalls.
> V minimum sink
In light winds and stable air the preferred speed of Drone 1-2-3 is V-minimum-sink. This is the speed at which the aircraft is losing the least altitude in a given amount of time in dead air. It's a good speed to fly in lift areas for maximum altitude gain. Minimum sink is found just a bit above stall speed,
My estimated V-minimum-sink for Drone 1-2-3 was approximately 24kph, at a sink of around 0.6m/s. I assumed a glide angle of approximately -3deg would result in this speed.
> V max L/D (V best glide ratio)
V-max-L/D is the speed at which a glider will cover the most distance from a given altitude. The speed with the best best glide ratio. This is generally a slightly higher speed than V-minimum-sink. So, a shorter flight time, but you go farther, maybe reaching a landing area that is free of obstacles instead of landing out in the trees...
My estimated V-max-L/D for Drone 1-2-3 was approximately 29kph, at a glide ratio of 13:1 I assumed a glide angle of approximately -4deg would result in this speed.
> Higher flying speeds in strong winds or turbulence
When Drone 1-2-3 flies at V-minimum-sink, even if it flies straight into the wind, a wind of >4.5 Beaufort would make it go backwards. So, stronger winds demand higher flying speeds. Also in less stable or turbulent air it is some times saver to fly not too close to stall speed.
Actual flight testing! Check!
Last week I did close to 50 testflights in pleasant late-summer weather.
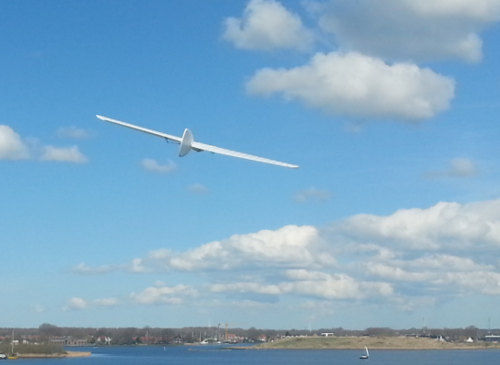
Drone 1-2-3 flies very stable. Much better than I could fly it. When flying through unstable or turbulent air, it corrects itself immediately and determinedly. Most flights were between 40 seconds and 1 minute. All flights (but one) resulted in perfectly soft landings.
The R/C equipment did not so well. During a large part of the flights it lost connection. 100-200m flying distance was all that was needed to get out of range of the R/C transmitter. This was a perfect test to see how Drone 1-2-3 could do by itself. And it did above expectation. Hundreds of meters, showing excellent autonomous flying. In the current setup this means gliding in a straight line, needing lots of open space. During one flight it managed to hit a soccer goal. The only obstacle around!
After the flights there was no visual damage to the air-frame. Only some dirt marks and for the trained eye, a few dents in the wings' leading edge caused by Drone 1-2-3 pushing a goal.
Actual V-minimum-sink, sink, V max L/D and glide ratio seem to be pretty close to my estimates. However, the glide angles that I had set, turned out to be much to steep. The plane was fastly building up far too much speed. This could easily be solved by trimming the throttle slightly backwards.
Testing the envelope: Forcing Drone 1-2-3 to stall. Check!
To test stall entry and exit properties, I slowly pulled the throttle stick (airspeed) backwards, until the airflow over the wing became interupted and Drone 1-2-3 entered a stall. It only took the plane only a fraction of a second to dive and restore a smooth airflow.
If at that moment, I had pushed the throttle stick swiftly forward towards a normal speed setting, there wouldn't be any complications. As if it never had happened. I tested this a couple of times and Drone 1-2-3 recovered fine.
But this time I kept the stick where it was (backwards). As soon as the airflow was restored and wing and control services were working again, the APM forced the nose up and consequently the airspeed down until it entered another stall... and another... and another... It hopped through the sky with the whole cycle taking less than a second.
Pushing the throttle stick a little forward consistently ended the hopping and Drone 1-2-3 continued its normal flight path.
It never entered a spin or became unstable in other ways. Like most stall friendly wing designs, Drone 1-2-3's wingtips have a slightly lower angle of attack than the middle, so most likely the middle of the wing will stall faster than the tips. This prevents the wing from tip-stalling, where one wing drops and the whole plane starts spinning.
Drone 1-2-3 passed the stall test with honors :-)
Follow up - With new R/C equipment!
I like to continue testing with a new more reliable R/C-set in approximately the same setup, and start making extended flights in proper lift conditions (>3bft).
Then in a less basic hardware setup, have Drone 1-2-3 follow a flight plan to keep itself in a predefined lift area. To make extended flights without any R/C input.
Ordering a new RC-set & Invested in this project
I ordered a Turnigy/FlySky i-10 (download manual). A long range 10-channel R/C set with a simple user-friendly interface. The package includes transmitter, transmitter LiPo, iA10 receiver with Rx-voltage telemetry, and 3 separate telemetry modules (temperature, RPM and non-Rx-voltage).
After its arrival, I did a first simple range test in the urban environment where I live. With the transmitter at a fixed point at ground level, I biked away with the receiver. Up to >250m, this was in line of sight or with a one story building in between. The set worked fine. Only further down the road behind an eight story building the link was lost as one would expect with 2.4GHz. So far so good!
16.10 euro was spent on the new LiPo on board battery and the 6 solar cells were 18.60 euro, for both items this includes shipping and (delivery free of) taxes. The new R/C equipment was purchased from Hobbyking's European warehouse including duties and shipping for 161 euros.
So, the total amount spent on this project so far is: 82 euro (until Jul 2015) +16.10 (battery) +18.60 (solar cells) and 161 euro for the R/C-set = a total of 278 euros.
=== Dec 13, 2015 - After the end of November 2015, I've stopped giving indications on "money invested in this project".
Friends and businesses have kindly donated substantial hardware and/or given financial support for the Drone 1-2-3 project since then :-) Continuing to present all the parts used in this project as personal out-of-pocket spending would divert from reality.
Oct 3, 2015 - Short test flights with the new Tx/Rx near the Sloterplas
Because of te wet grass, Drone 1-2-3 became a little bit more 'soaked' after each landing. When flying was finished, I left the electricity on for a while in an attempt to dry up its internals a bit.
Oct 4, 2015 - First flight at Zoutelande
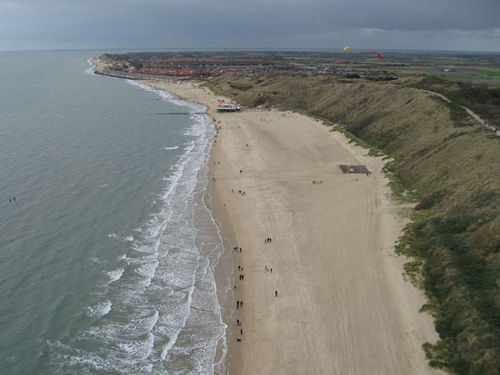
Weather conditions were excellent. A south west wind of 16-24kph (3-4bft) was measured on top of the dune. So, wind speed should be somewhat lower further away from the ridge due to the absence of any venturi-effect on passing airflow.
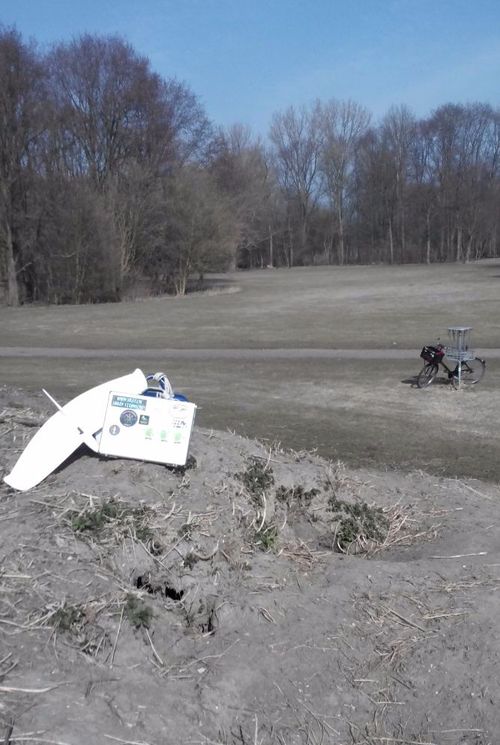
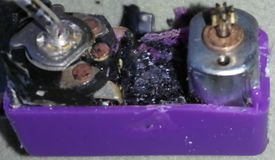
Take off and flying went great. What a lift! Unfortunately, within 15 minutes Drone 1-2-3 experienced a short-circuit in one of the servos. Was it still yesterday's water inside one of the servos?
Anyway, I was forced to land Drone 1-2-3 on top of the dune into the shrubs. The servo still smoking.
(Dutch TOP25raster maps are available under CC-BY-4.0 licence:)
The flying area is shared with paragliders, whom have an official take off and landing site at Zoutelande. The paraglider pilots are very open friendly chaps. They had no problem sharing 'their' airspace with Drone 1-2-3.
Learned from flying at Zoutelande
Drone 1-2-3's speed range is too narrow if flying speed is solely controlled by the plane's attitude. I expect that the plane will be easier kept stable at higher flying speeds and when exiting turns, if an airspeed meter with splitter tube is used.
Navigating the plane to and keeping it in the lift area is a boring task. Automating this task has a high priority for me.
Drone 1-2-3 needs a tracking device to find it back after a sudden forced landing. It's really easy to lose a plane in overgrown dunes.
So, to do after Zoutelande
- Change/repair the broken servo
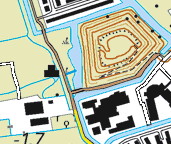
==== Check! Nov 12, 2015: 3hrs of flying fun at the flying spot in Zaandam (De Belt). Spread over about 20 flights of 3-20min each with approximately 22-30kph westerly winds (4bft). Not a large place, surrounded by water, a little gusty, some turbulence. Navigating the plane was quiet a challenge for me. It would be much more difficult to fully automate this task for an area like this, as compared to Zoutelande. Flying at De Belt hasn't bored me a minute :-)
(Source: TOP25raster maps)
=== Check! Nov 23, 2015 - A flight of 1:09hr was clocked during the second visit to Zoutelande. The south west breeze of 32-38kph (5bft) generated so much lift that day, that it was even difficult to convince Drone 1-2-3 that it was time to land. Flying circles above the sea and when low enough returning to the beach for landing, did the trick.
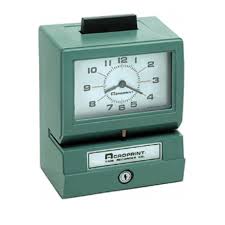
=== Check! Dec 7, 2015 - A flight of 2:55hr was clocked during the first flying session at the Maasvlakte (Slufter). The moderate south breeze of 25-33kph (4-5bft) provided smooth lifting air that day.
- Calibrate and implement the airspeed meter
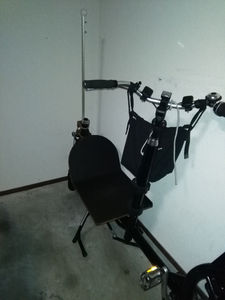
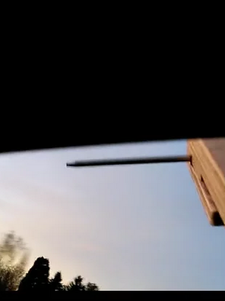
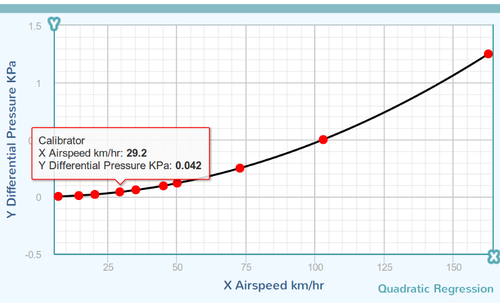
=== Dec 5, 2015 - The attempts to calibrate the airspeed meter solely from a construction on the front of my bicycle didn't work out well. To get reliable results, more data are needed over a greater (and higher) speed range. Hanging the airspeed meter out of a car window on the highway went better. It produced usable data over the 60-120kph speed range. Next step is to get back on the bike and fill in the data over the 0-60kph speed range. A speed range that is closer to Drone 1-2-3's normal flying speeds.
Aero testing outside the contrived environment of a wind tunnel
===Dec 14, 2015 - Oops! Not solved yet
it's hard to get consistent readings, and hence difficult to calibrate the airspeed meter around the most relevant airspeeds.
At slow airspeeds e.g. around stall & minimum sink (24kph), the speed curve of differential (pitot) pressure KPa (Y-axis) versus airspeed kph (X-axis) becomes almost flat. Moreover, there is drift of and temperature influence on the used analog MPXV7002 sensor that have significant impact on KPa readings as well.
All things added up, calculating airspeed is not nearly as accurate as needed for better flight performance. So, for the time being we'll stick to control of plane attitude i.s.o. direct control of airspeed.
- Install GPS and compass and start mapping the lift areas
- Install a tracking system to find the plane after a crash or forced landing in difficult terrain
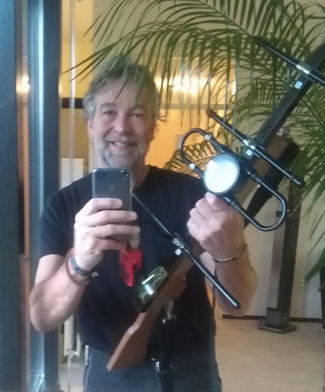
=== Dec 20, 2015 - Drone 1-2-3 will carry a small tracking-transmitter with its own independent power source. If anything else fails, it can be activated by a tone burst of a Baofeng UV-5R UHF 70cm 2-way radio that is attached to a directional antenna.
A directional yagi antenna was mounted on a rifle style handle for "fox hunting" Drone 1-2-3
Jun 15, 2017 - Complying with the Latest Drone Flying Rules
The Dutch regulator implemented new strict rules for remotely piloted light aircraft.
Unfortunately, drone flying is banned from some of my favorite sites now :-(
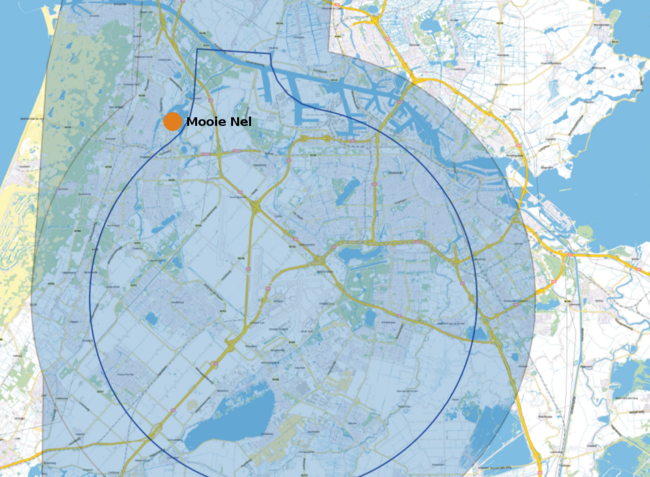
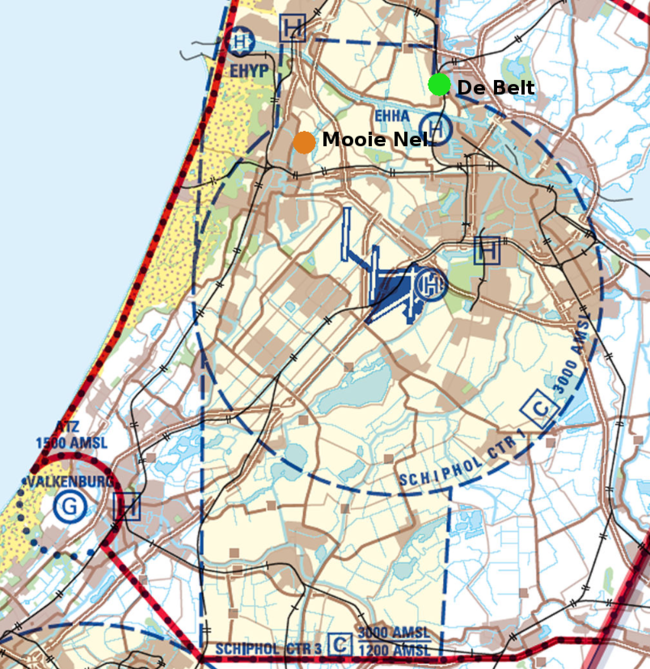
Mooie Nel, De Belt and the Sloterplas flying sites are in the Amsterdam/Schiphol CTR. Flying at these places is not allowed or tolerated anymore (See maps below).
Flying is still legal at Zoutelande and at the Maasvlakte (Slufter).
But you'll have to deal with the new rules:
To the best of my knowledge flying with light (less than 4kg) drones or remote controlled aircraft without holding any permits or licenses is allowed in the Netherlands if the following conditions are met:
- Fly during the daylight period
- No flying in built-up areas
- More than 50m from roads or buildings
- More than 150m from people or rail tracks
- Fly less than 50m above ground level
- The person who controls the drone must have it in sight at all times (no FPV) and at a distance of less than 100m
- Only fly when there is no manned aircraft nearby (if so, land immediately)
- Stay more than 3km away from (uncontrolled) airfields and no-fly zones
- No flying near CTRs of airtraffic controlled airports
New Flying sites
Finding new flying sites in the Netherlands is quite a challenge.
The dune area near Zandvoort aan Zee offers good stable conditions with W to NW wind directions. Also, the ski hill near Nieuwegein could work really well with a westerly wind.
The Amsterdam flying club Icarus has a long standing agreement with the Dutch regulator to fly under strict rules at their airfield near Ruigoord on the far west outskirts of Amsterdam.
It has no hills that support slope soaring, but it offers a nice site for short test flights in the Amsterdam CTR.
To fly at this privileged place, you'll need to become a member of Icarus and of course follow their rules.
Icarus consists of a group of relaxed friendly model aircraft enthusiasts and is open for new members.
