Difference between revisions of "LINSN LED strips"
(→Head-units) |
m |
||
| (7 intermediate revisions by one other user not shown) | |||
| Line 2: | Line 2: | ||
|picture=LINSN LED.jpg | |picture=LINSN LED.jpg | ||
|ProjectSkills=Basic electronics, Reverse engineering firmware, | |ProjectSkills=Basic electronics, Reverse engineering firmware, | ||
| − | |ProjectStatus= | + | |ProjectStatus=Dormant |
|ProjectNiche=Electronics | |ProjectNiche=Electronics | ||
|ProjectPurpose=Fun | |ProjectPurpose=Fun | ||
| Line 22: | Line 22: | ||
== LED-panel == | == LED-panel == | ||
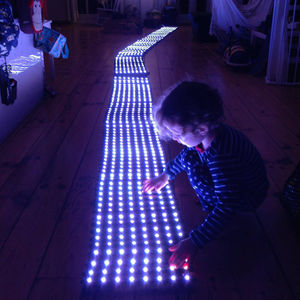
| − | The LED-panels consist of strips with 8 RGB-LED's each and are mechanically connected together by two braided nylon-strips along both sides. Electronically they are linked together by a 2-wire power-bus (24Volt) and a | + | The LED-panels consist of strips with 8 RGB-LED's each and are mechanically connected together by two braided nylon-strips along both sides. Electronically they are linked together by a 2-wire power-bus (24Volt) and a 5-wire databus (signal-ground, serial data, clock, latch and (most likely) OutputEnable, see below). |
Each strip has a small switch-mode power-supply on the edge that has the power-connector on it; this supplies both LED's as well as supporting logic. | Each strip has a small switch-mode power-supply on the edge that has the power-connector on it; this supplies both LED's as well as supporting logic. | ||
| Line 30: | Line 30: | ||
* In-connector->(half of) octal transceiver->16-bit shift register 1->16 bit shift-register 2->(half of)octal transceiver->Out->connector | * In-connector->(half of) octal transceiver->16-bit shift register 1->16 bit shift-register 2->(half of)octal transceiver->Out->connector | ||
| − | Effectively, this creates a single long shift-register of 32-bits per LED-strip with signal reconditioning at the in and output sides. The LEDs are linked to the outputs of the shift-register which have 'Latch', 'Clock' and 'OutputEnable' in a paralel-bus topology with the other strips, the 'SerialDataIn' signal is fed 'through' each shift-register in turn. | + | Effectively, this creates a single long shift-register of 32-bits per LED-strip with signal reconditioning at the in and output sides. The LEDs are linked to the outputs of the shift-register which have 'Signal-ground', 'Latch', 'Clock' and 'OutputEnable' in a paralel-bus topology with the other strips, the 'SerialDataIn' signal is fed 'through' each shift-register in turn. |
One thing that needs to be investigated is how each 16-bit shift-register seems responsible for only 12 outputs (4 x RGB LED). Is there perhaps a function for the extra 4 bit positions ? | One thing that needs to be investigated is how each 16-bit shift-register seems responsible for only 12 outputs (4 x RGB LED). Is there perhaps a function for the extra 4 bit positions ? | ||
| + | |||
| + | |||
| + | === Connectors === | ||
The first and last strips in each mat link to female/male connectors respectively that will allow you to daisy-chain both power and data-buses to a next mat of led-strips. | The first and last strips in each mat link to female/male connectors respectively that will allow you to daisy-chain both power and data-buses to a next mat of led-strips. | ||
| + | The power-connectors seem to resemble the [[http://www.switchcraft.com/productsummary.aspx?Parent=857 Switchcraft MicroCon]] series. | ||
| + | The data-connectors dont seem to have an easy match with any of the harsh-environment 'lockable' connectors that SwitchCraft supplies. Most 5-pin connectors seem to prefer a 'cross-style' layout (like the 5 on a six-sided die). It may be a custom part. | ||
| − | + | === Chips/board === | |
'''[[http://www.autcomp.com.br/fichas/macroblock/Drivers/DCDC/MBI5024%20Datasheet%20VA%2002-EN%20.pdf 16-bit Shift Register with latch, output-enable and adjustabble constant-current drivers:]]''' | '''[[http://www.autcomp.com.br/fichas/macroblock/Drivers/DCDC/MBI5024%20Datasheet%20VA%2002-EN%20.pdf 16-bit Shift Register with latch, output-enable and adjustabble constant-current drivers:]]''' | ||
| Line 66: | Line 71: | ||
* 1x Data out (date out) via [[http://www.neutrik.com/en/data/ethercon/a-series/ne8fah Neutrik EtherCon]] | * 1x Data out (date out) via [[http://www.neutrik.com/en/data/ethercon/a-series/ne8fah Neutrik EtherCon]] | ||
* 2x 24Volt out(1 and 2) via [[http://www.neutrik.com/en/speakon/speakon-chassis-connectors/speakon-chassis-connectors/ Neutrik SpeakCon]] | * 2x 24Volt out(1 and 2) via [[http://www.neutrik.com/en/speakon/speakon-chassis-connectors/speakon-chassis-connectors/ Neutrik SpeakCon]] | ||
| − | * 4x 'date out' to LED-mats via something that looks like it's been made by 'SwitchCraft'; resembling a miniature 'din' layout with 5 | + | * 4x 'date out' to LED-mats via something that looks like it's been made by 'SwitchCraft'; resembling a miniature 'din' layout with 5 pins. |
| + | |||
| + | |||
| + | The 24-volt connectors have wire-harnesses available that allow you to connect 2 led-mats to it in parallel. | ||
| + | |||
| + | Internally, the unit consists of two large switched-mode powersupplies (smps) that provide 24Volt on two beefy terminals each and lead to the front-panel connectors as well as supplying some internal logic-board that has the RJ-45-connectors and the 5-pin connectors hooked up to it. | ||
| + | |||
| + | === Logic Board=== | ||
| + | [[File:Headunit-ROE_RV802net-1.jpg|thumb|Overview of Head-unit logicboard]] | ||
| + | |||
| + | The logic-board inside the head-unit seems to be the following: [[http://www.linsn.com/CanPin/rv802.htm RV802NET]]. | ||
| + | Note that the picture on that page seems to show a predecessor of the RV802, the RV702. There is no info about any of the controllers on the english version of the LINSN site. | ||
| + | However, it seems that they are really enthousiastic about re-labelling every chip on their hardware with their logo, check: [[http://www.linsn.com/images/image54.jpg this example]] | ||
| + | |||
| + | Googling for the RV802NET card leads to a number of english hits, however: | ||
| + | |||
| + | [[http://visuallumen.com/parts/linsn-rv802d-receiving-card.html]] for example shows a perfect picture of the card that looks like the one we have, without the [[http://wiki.techinc.nl/images/a/ab/Headunit-ROE_RV802net-2.jpg]] line-driver daughterboard, however and 'receiving processor' that consists of two chips instead of just one. Ours is covered with a heat-sink. The black chip behind is labelled 'XILINX' and is likely an FPGA with a custom function. | ||
| + | |||
| + | |||
| + | [[File:Headunit-ROE_RV802net-2.jpg|thumb|Line-driver daughterboard closeup]] | ||
| + | |||
| + | The VisualLumen link above leads to a PDF that has all kinds of info about how to set this controller up in LedStudio. | ||
| + | |||
| + | Looking at the info on the site, it seems there are two ways that the board can output it's data. Either via Serial (26-pin connector J3) or Parallel (16-pin J4). | ||
| + | The line-driver daughterboard clearly shoes that only pin 1-18 are actually in use. | ||
| + | |||
| + | The pinout for connector J3 is listed in the table below: | ||
| + | {| | ||
| + | !Pin | ||
| + | !function | ||
| + | !function | ||
| + | !Pin | ||
| + | |- | ||
| + | |1 | ||
| + | |D | ||
| + | |C | ||
| + | |2 | ||
| + | |- | ||
| + | |3 | ||
| + | |B | ||
| + | |A | ||
| + | |4 | ||
| + | |- | ||
| + | |5 | ||
| + | |LAT | ||
| + | |CLK | ||
| + | |6 | ||
| + | |- | ||
| + | |9 | ||
| + | |R8 | ||
| + | |R7 | ||
| + | |10 | ||
| + | |- | ||
| + | |11 | ||
| + | |R6 | ||
| + | |R5 | ||
| + | |12 | ||
| + | |- | ||
| + | |13 | ||
| + | |R4 | ||
| + | |R3 | ||
| + | |14 | ||
| + | |- | ||
| + | |15 | ||
| + | |R2 | ||
| + | |R1 | ||
| + | |16 | ||
| + | |- | ||
| + | |17 | ||
| + | |GND | ||
| + | |R16 | ||
| + | |18 | ||
| + | |- | ||
| + | |19 | ||
| + | |R15 | ||
| + | |R14 | ||
| + | |18 | ||
| + | |- | ||
| + | |21 | ||
| + | |R13 | ||
| + | |R12 | ||
| + | |22 | ||
| + | |- | ||
| + | |23 | ||
| + | |R11 | ||
| + | |R10 | ||
| + | |24 | ||
| + | |- | ||
| + | |25 | ||
| + | |R9 | ||
| + | |GND | ||
| + | |26 | ||
| + | |} | ||
| − | == Boards / Boxes == | + | The function of the 'LAT', 'CLK' and 'GND' pins is easy to guess. The R-pins are likely to correspond to 'row'. Given that there are 9 of them soldered (R1-R8 and R16) this might correspond to the SDIN and OE lines on the buses to the led-mats. It should be interesting to check if R16 leads to anything. The function of the A-C pins is unclear and requires investigation; perhaps these are, in fact, the OE-lines ? |
| + | |||
| + | The board [[http://wiki.techinc.nl/images/c/c6/Headunit-ROE_RV802net-3.jpg has a set of RJ45-connectors onboard]] that likely accept standard Ethernet signalling. The fact that the cables supplied with the head-unit are labelled 'LAN LINE' seems to corroborate this, as does the presences of the RealTek logo on the [[http://www.linsn.com/CanPin/rv802.htm RV701 card]], the predecessor to the one we have. | ||
| + | |||
| + | == Other links to Boards / Boxes == | ||
'''Receiving Card:''' | '''Receiving Card:''' | ||
http://www.ledcontrolcard.com/led-receiving-card-c-15_20/linsn-rv802-led-receiving-card-p-46.html | http://www.ledcontrolcard.com/led-receiving-card-c-15_20/linsn-rv802-led-receiving-card-p-46.html | ||
| Line 74: | Line 175: | ||
'''Sending Card (?):''' | '''Sending Card (?):''' | ||
http://www.ledcontrolcard.com/led-sending-card-c-15_19/linsn-ts801d-led-control-cardsd801d-and-l202-led-card-p-4.html | http://www.ledcontrolcard.com/led-sending-card-c-15_19/linsn-ts801d-led-control-cardsd801d-and-l202-led-card-p-4.html | ||
| − | |||
==Photos== | ==Photos== | ||
| Line 80: | Line 180: | ||
| − | == | + | ==How to get it to work== |
| − | + | ===Approach 1=== | |
| + | * Using a Logic Analyzer to sniff the data between a Sending- and Receiving Card. | ||
| + | * Difficulty Easy-Medium | ||
| + | This requires us to get our hands on one of the 'sending' cards and a copy of LEDSTUDIO that will allow us to sniff the protocol. A card seems to be available for around 160 Euro, if reports are correct. | ||
| + | |||
| + | ===Approach 2=== | ||
| + | * We fuzz the shit out of it over the Ethernet-bus | ||
| + | * Difficulty Hard | ||
| + | |||
| + | There's a chance that the 'protocol' is quite simple and doesnt do much in the way of error-checking, etc, apart from the standard ethernet CRC's or what-have-you. Perhaps sending random ethernet-frames will get some interesting outputs. | ||
| + | |||
| + | It might be useful to go through the setup information on some of the sites listed above to see if it is possible to deduce the data-layout based on the led-mat arrangements available. Also, it might be possible to deduce wether the PWM'ing of color-values is done in the CONTROLLER-FPGA or the one(s) on the SENDING-card FPGA's | ||
| + | |||
| + | ===Approach 3=== | ||
| + | * We don't use the controllers and build our own system | ||
| + | * Difficulty Easy-Insane | ||
| + | The protocol on the LED-mats seems straight-forwards enough. The real challenge is, of course, to do full 50FPS video on one of these systems and that's what the special cards and high-speed LAN-buses are used for. Bit-banging a single LED-mat should be quite easy; especially at lower FPS's and/or full on/off RGB control (aka: no PWM). | ||
| + | Perhaps it is , in fact, possible to make a system that uses unicast frames on ethernet that contain the RGB-info and have each 'row-unit' ; using a gigabit-switch to segment a Gigabit uplink into 100mbit channels that Atmega/xmega/msp430-based hardware might be able to cope with | ||
| − | + | Having a simple scroll-text running over a semi-long segment of this stuff should, in fact, be quite simple to achieve. | |
Latest revision as of 09:50, 1 October 2015
| Projects | |
|---|---|

| |
| Participants | Epidemik, Justa |
| Skills | Basic electronics, Reverse engineering firmware |
| Status | Dormant |
| Niche | Electronics |
| Purpose | Fun |
Contents
Background
Owner of the LED mats has about 40m2 in total, has multiple power supplies but no "control box". The power supplies contain a Receiver Card, the missing component is the Sender Card.
The owner would like to hang some mats on the side of his van when parked at events, so he can display text (dynamically). Since he only needs a small amount of the mats, the unused mats need the same.
Manufacturer/Distrubutor/Model
[LINSN LED] seems to be the chinese manufacturer of the hardware that [Radiant Opto Electronics] sells on the western market.
The led-panels in question seems to be the [LED Curtain Screen Linx-30(?)] and have been supplied with 19" 'head-units' that contain supporting electronics. The system lacks a 'driver' card that belongs to it; nor is there any software supplied with what we have, currently.
Teardown
LED-panel
The LED-panels consist of strips with 8 RGB-LED's each and are mechanically connected together by two braided nylon-strips along both sides. Electronically they are linked together by a 2-wire power-bus (24Volt) and a 5-wire databus (signal-ground, serial data, clock, latch and (most likely) OutputEnable, see below).
Each strip has a small switch-mode power-supply on the edge that has the power-connector on it; this supplies both LED's as well as supporting logic.
The data-bus seems to be be built in the following manner:
- In-connector->(half of) octal transceiver->16-bit shift register 1->16 bit shift-register 2->(half of)octal transceiver->Out->connector
Effectively, this creates a single long shift-register of 32-bits per LED-strip with signal reconditioning at the in and output sides. The LEDs are linked to the outputs of the shift-register which have 'Signal-ground', 'Latch', 'Clock' and 'OutputEnable' in a paralel-bus topology with the other strips, the 'SerialDataIn' signal is fed 'through' each shift-register in turn.
One thing that needs to be investigated is how each 16-bit shift-register seems responsible for only 12 outputs (4 x RGB LED). Is there perhaps a function for the extra 4 bit positions ?
Connectors
The first and last strips in each mat link to female/male connectors respectively that will allow you to daisy-chain both power and data-buses to a next mat of led-strips. The power-connectors seem to resemble the [Switchcraft MicroCon] series. The data-connectors dont seem to have an easy match with any of the harsh-environment 'lockable' connectors that SwitchCraft supplies. Most 5-pin connectors seem to prefer a 'cross-style' layout (like the 5 on a six-sided die). It may be a custom part.
Chips/board
[16-bit Shift Register with latch, output-enable and adjustabble constant-current drivers:]
- MBI5024GP <-- partnumber; made by 'Macroblock'
- DP317811HB <-- Trackingnumber
Abridged specs:
- 16 Bit shift-register with serial in, clock and output-enable and latch-function
- 25 MHZ clock freq.
- 5v/3.3v capable
- constant-current up to 3-45mA@VDD=5V or 3-30mA@VDD=3.3V , set by resistor on reference-input.
8-port bi-directional high-Z transciever (aka: [octal line driver]) or [Octal Bus transceiver, 3-state])
- (74)HC245 <-- 74xx series TTL 'Highspeed Cmos', partnumber 245
- 9A8D407 <-- Internal numbering/tracking/package-info
- UuG920E <-- Same
- NXP <-- NXP corp; formerly Philips Semiconductors
Head-units
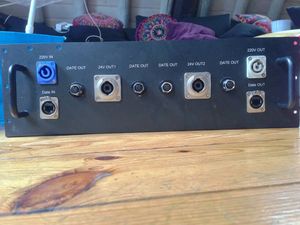
The head-unit has a front-plate that provides the following connectors:
- 1x 220V in via [Neutrik PowerCon 20 A Blue]
- 1x 220V out via [Neutrik PowerCon 20 A White]
- 1x Data in (date in) via [Neutrik EtherCon]
- 1x Data out (date out) via [Neutrik EtherCon]
- 2x 24Volt out(1 and 2) via [Neutrik SpeakCon]
- 4x 'date out' to LED-mats via something that looks like it's been made by 'SwitchCraft'; resembling a miniature 'din' layout with 5 pins.
The 24-volt connectors have wire-harnesses available that allow you to connect 2 led-mats to it in parallel.
Internally, the unit consists of two large switched-mode powersupplies (smps) that provide 24Volt on two beefy terminals each and lead to the front-panel connectors as well as supplying some internal logic-board that has the RJ-45-connectors and the 5-pin connectors hooked up to it.
Logic Board
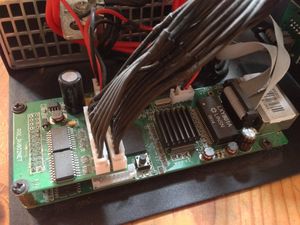
The logic-board inside the head-unit seems to be the following: [RV802NET]. Note that the picture on that page seems to show a predecessor of the RV802, the RV702. There is no info about any of the controllers on the english version of the LINSN site. However, it seems that they are really enthousiastic about re-labelling every chip on their hardware with their logo, check: [this example]
Googling for the RV802NET card leads to a number of english hits, however:
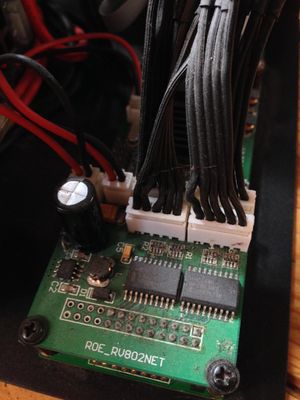
[[1]] for example shows a perfect picture of the card that looks like the one we have, without the [[2]] line-driver daughterboard, however and 'receiving processor' that consists of two chips instead of just one. Ours is covered with a heat-sink. The black chip behind is labelled 'XILINX' and is likely an FPGA with a custom function.
The VisualLumen link above leads to a PDF that has all kinds of info about how to set this controller up in LedStudio.
Looking at the info on the site, it seems there are two ways that the board can output it's data. Either via Serial (26-pin connector J3) or Parallel (16-pin J4). The line-driver daughterboard clearly shoes that only pin 1-18 are actually in use.
The pinout for connector J3 is listed in the table below:
| Pin | function | function | Pin |
|---|---|---|---|
| 1 | D | C | 2 |
| 3 | B | A | 4 |
| 5 | LAT | CLK | 6 |
| 9 | R8 | R7 | 10 |
| 11 | R6 | R5 | 12 |
| 13 | R4 | R3 | 14 |
| 15 | R2 | R1 | 16 |
| 17 | GND | R16 | 18 |
| 19 | R15 | R14 | 18 |
| 21 | R13 | R12 | 22 |
| 23 | R11 | R10 | 24 |
| 25 | R9 | GND | 26 |
The function of the 'LAT', 'CLK' and 'GND' pins is easy to guess. The R-pins are likely to correspond to 'row'. Given that there are 9 of them soldered (R1-R8 and R16) this might correspond to the SDIN and OE lines on the buses to the led-mats. It should be interesting to check if R16 leads to anything. The function of the A-C pins is unclear and requires investigation; perhaps these are, in fact, the OE-lines ?
The board [has a set of RJ45-connectors onboard] that likely accept standard Ethernet signalling. The fact that the cables supplied with the head-unit are labelled 'LAN LINE' seems to corroborate this, as does the presences of the RealTek logo on the [RV701 card], the predecessor to the one we have.
Other links to Boards / Boxes
Receiving Card: http://www.ledcontrolcard.com/led-receiving-card-c-15_20/linsn-rv802-led-receiving-card-p-46.html
Sending Card (?): http://www.ledcontrolcard.com/led-sending-card-c-15_19/linsn-ts801d-led-control-cardsd801d-and-l202-led-card-p-4.html
Photos
How to get it to work
Approach 1
- Using a Logic Analyzer to sniff the data between a Sending- and Receiving Card.
- Difficulty Easy-Medium
This requires us to get our hands on one of the 'sending' cards and a copy of LEDSTUDIO that will allow us to sniff the protocol. A card seems to be available for around 160 Euro, if reports are correct.
Approach 2
- We fuzz the shit out of it over the Ethernet-bus
- Difficulty Hard
There's a chance that the 'protocol' is quite simple and doesnt do much in the way of error-checking, etc, apart from the standard ethernet CRC's or what-have-you. Perhaps sending random ethernet-frames will get some interesting outputs.
It might be useful to go through the setup information on some of the sites listed above to see if it is possible to deduce the data-layout based on the led-mat arrangements available. Also, it might be possible to deduce wether the PWM'ing of color-values is done in the CONTROLLER-FPGA or the one(s) on the SENDING-card FPGA's
Approach 3
- We don't use the controllers and build our own system
- Difficulty Easy-Insane
The protocol on the LED-mats seems straight-forwards enough. The real challenge is, of course, to do full 50FPS video on one of these systems and that's what the special cards and high-speed LAN-buses are used for. Bit-banging a single LED-mat should be quite easy; especially at lower FPS's and/or full on/off RGB control (aka: no PWM).
Perhaps it is , in fact, possible to make a system that uses unicast frames on ethernet that contain the RGB-info and have each 'row-unit' ; using a gigabit-switch to segment a Gigabit uplink into 100mbit channels that Atmega/xmega/msp430-based hardware might be able to cope with
Having a simple scroll-text running over a semi-long segment of this stuff should, in fact, be quite simple to achieve.


